
Installation Manual


10-36 Parts Replacement
To install the Computer:
? NOTE Apply removable thread locker to all threaded fasteners unless otherwise noted.
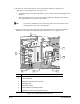
1. Lift the Computer, place it in the Lower Front Cabinet, and align the three holes in the
Computer Mount with the corresponding holes in the floor of the Cabinet.
WARNING! The Computer is heavy. Use caution while lifting the Computer out of the Lower
Front Cabinet or back injury may occur. Refer to the Safety section of this
manual for lifting precautions.
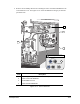
2. Install the three 4-mm socket head cap screws, washers, and Wire Harness Clips to attach the
Computer Mount to the floor of the Lower Front Cabinet. See Figure 10-17. Torque to
12 in-lbs (0.138 kg-m).
3. Connect all of the cables to the appropriate connectors on the Computer Main Interface Panel.
See Figure 10-17.
> Labels on the cables should correspond to the labels on the connectors.
4. Close the Lower Front Cabinet Door and go to the back of the dispensing system.
5. Connect the cables inside the Rear Cabinet to the appropriate connectors on the back of
the Computer.
> Labels on the cables should correspond to the labels on the connectors.
6. Close the Rear Cabinet Door.
7. Perform a Post-Service Start-up as specified in the Safety section of this manual.