
Installation Manual


Parts Replacement 10-35
Computer Removal and Installation
It may be necessary to remove the Computer from its location in the Lower Front Cabinet if fault isolation
procedures in the Troubleshooting section of this manual have confirmed that there is a faulty card or
other problem inside the Computer.
CAUTION! This procedure should only be performed by a trained service technician.
Tools and Materials Needed
• 4-mm Hex Key • Flat Head Screwdriver
• Torque Wrench
To remove the Computer:
? NOTE All components and fasteners removed during this procedure should be retained in an
orderly manner for reinstallation.
1. Perform a Service Shutdown as specified in the Safety section of this manual.
2. Open the Rear Cabinet Door.
3. Take note of where each cable is connected to the back of the Computer. Label the cables and
connections if necessary.
4. Disconnect all of the cables from the back of the Computer. You should be able to loosen the
cable connectors by hand. Use a flat head screwdriver if necessary.
5. Open the Lower Front Cabinet Door.
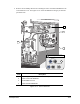
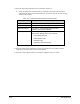
6. Take note of where each cable is connected to the Computer Main Interface Panel. Label the
cables and connections if necessary. See Figure 10-17.
7. Disconnect all of the cables from the Computer Main Interface Panel. You should be able to
loosen the cable connectors by hand. Use a flat head screwdriver if necessary.
8. Remove the three 4-mm socket head cap screws, washers, and Wire Harness Clips from the
Computer Mount. See Figure 10-17.
9. Carefully move all loose cables away from the Computer.
10. Remove the Computer from the Lower Front Cabinet.
WARNING! The Computer is heavy. Use caution while lifting the Computer out of the Lower
Front Cabinet or back injury may occur. Refer to the Safety section of this
manual for lifting precautions.