
Installation Manual


Parts Replacement 10-31
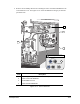
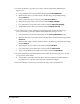
12. Remove the two 4-mm socket head cap screws and washers attaching the back of the
Dispensing Head to the X-Pulley Bracket. See Figure 10-16.
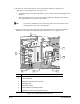
13. Push the Z-Carriage Plate downward and remove the two 4-mm socket head cap screws
attaching the front of the Dispensing Head to the X-Pulley Bracket. See Figure 10-15.
WARNING! CAUTION!
Hold onto the Dispensing Head when the two front screws are removed to
prevent the Dispensing Head from falling and causing serious injury and/or
damage to the dispensing system.
14. Carefully remove the Dispensing Head.
? NOTE The faulty Dispensing Head should be returned to Asymtek. Refer to “Return Material
Authorization” in this section for merchandise return instructions.
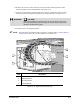
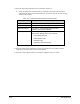
Item Description
1 Cat Track
2 Dispensing Head
3 Mounting Screws
4 X-Pulley Bracket
Figure 10-16 Dispensing Head Rear View
3
1
2
4