
Installation Manual


Parts Replacement 10-17
Replacing the Scale
If it is determined by the fault isolation procedures in the Troubleshooting section of this manual that the
Scale must be replaced, this procedure will provide the steps necessary to remove the faulty unit and
install a new one.
CAUTION! This procedure should only be performed by a trained service technician.
The Scale is a precision instrument with delicate components. Handle the Scale
components with care or they may be damaged.
The Serial Number of the Scale Control Module and the Balance Module must
match. Failure to install matched pairs will adversely effect Scale accuracy.
? NOTES When disconnecting cables, take note of where they are connected. Cables are usually
labeled by part numbers and are referenced on the schematics in Appendix B of this
manual. Label the cables and connections if necessary.
Tools and Materials Needed
• Set of Metric Hex Keys • Removable Thread Locker (P/N 40-0019)
• Set of Standard Hex Keys • Replacement Scale (P/N 392364)
• Phillips Head Screwdriver • Torque Wrench
To remove the Scale:
? NOTE All components and fasteners removed during this procedure should be retained in an
orderly manner and in a safe location for reinstallation or shipment back to Asymtek.
1. If the dispensing system is shut down, start the dispensing system as specified in the Safety
section of this manual.
2. In FmNT, click on
Jog and in the Jog Commands dialog box, click on Home to send the rear
rail to the back of the dispensing chamber.
3. Perform a Service Shutdown as specified in the Safety section of this manual.
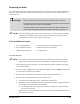
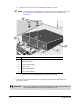
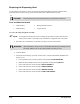
4. Remove Scale Control Module as follows (see Figure 10-7):
a. At the back of the dispensing system, open the Rear Cabinet Door.
b. Disconnect the Scale Communication Cable, Scale Power Cable, and Scale Interconnect
Cable from the rear of the Scale Control Module.
> You should be able to loosen the cable connectors by hand. Use a small, flat head
screwdriver if necessary.
c. Remove the two 4-mm socket head cap screws and washers attaching the Module to the
floor of the Rear Cabinet.