
Installation Manual


10-12 Parts Replacement
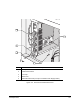
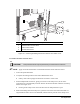
Item Description
1 Solenoid Valve Access Hatch
2 Hatch Cover Screws
3 Access Hatch Cover
Figure 10-4 Removing/Installing the Solenoid Valve Access Hatch Cover
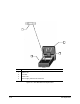
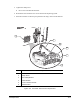
To install a Pneumatic Solenoid Valve:
CAUTION! This procedure should only be performed by a trained service technician.
? NOTE Apply removable thread locker to all threaded fasteners unless otherwise noted.
1. Locate the replacement PSV.
2. Verify that all sealing surfaces of the Valve Manifold are clean.
> If dirty, clean with isopropyl alcohol and a soft cloth or cotton swab.
3. With a Phillips head screwdriver, gently press down on the clamp screw, tilt the Valve
towards the rear, and diagonally insert the hook on the back of the PSV under the rear clamp
bracket. See Figure 10-5.
> Pressing on the clamp screw causes the font and rear clamp brackets to open.
4. While still holding down the clamp screw, press the front of the Valve downward until it is
aligned with the other valves in the manifold, and then release pressure on the clamp screw.
2
1
3