
Installation Manual


Parts Replacement 10-11
Replacing Pneumatic Solenoid Valves
The Pneumatic Valve Manifold controls airflow to pneumatic components in the Conveyor area such as
the Stop Pins, Lift Tables/Clamp Bars, and Vacuum Generators. This manifold can consist of up to eight
Pneumatic Solenoid Valves (PSVs) depending on your system’s configuration. Use the following
procedures to remove and replace Solenoid Valve modules if fault isolation procedures in the
Troubleshooting section of this manual have confirmed that they are faulty.
CAUTION! This procedure should only be performed by a trained service technician.
Foreign matter on sealing surfaces of the Solenoid Valve will result in air
leakage. Make sure that these surfaces remain clean during the performance of
this procedure.
Tools and Materials Needed
• Phillips Head Screwdriver • Replacement Pneumatic Solenoid Valve
(See Table 10-2)
• 4-mm Hex Key • Removable Thread Locker (P/N 40-0019)
Table 10-2 Replacement Solenoid Valves
Part Number Valve
197396 4-way Replacement Valve
197397 Dual 3-way Replacement Valve
To remove a Pneumatic Solenoid Valve:
? NOTE All components and fasteners removed during this procedure should be retained in an
orderly manner and in a safe location for reinstallation or shipment back to Asymtek.
1. Perform a Service Shutdown as specified in the Safety section of this manual.
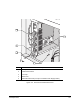
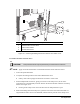
2. Remove the 4-mm socket head cap screws attaching the Access Hatch Cover to the back of
the dispensing system. See Figure 10-4.
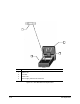
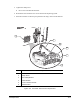
3. Turn the Phillips head clamp screw of the damaged PSV ten complete turns
counterclockwise. See Figure 10-5.
> This will loosen but not remove the clamp screw.
4. While pressing down gently on the clamp screw head, lift up on the front end of the PSV, and
then unhook the rear end of the Valve from the rear clamp bracket.
> Pressing on the head of the clamp screw opens the front and rear clamp brackets.
5. Remove the damaged PSV.