
Installation Manual


6-32 Calibration and Adjustment
Dispensing Head Counterbalance Adjustment
Whenever you change the type or number of Dispensing Valves, or otherwise substantially change the
weight on the Z-carriage of the Dispensing Head, you must adjust the Counterbalance Torsion Spring to
ensure reliable dispensing operations.
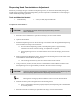
Tools and Materials Needed
• 6-mm Hex Key • 5/8-in (16-mm) Open-end Wrench
To adjust the counterbalance:
CAUTION! The following procedure should only be performed by a trained
service technician.
1. Perform a Service Shutdown as specified in the Safety section of this manual.
2. Open the Front Hatch.
3. Install the Dispensing Valve on the Z Carriage in accordance with the applicable Dispensing
Valve Installation and Operations Manual.
> On a shut down dispensing system, if the Dispensing Valve is approximately
centered in the travel of the Z-carriage, no adjustment is required.
> If the Dispensing Valve is not centered in the travel of the Z-carriage, proceed with
Step 4.
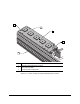
4. While supporting the Dispensing Valve, loosen the 6-mm Locking Screw in the center of the
Counterbalance Tension Knob. See Figure 6-15.
> The Z-carriage and Valve(s) will move to the bottom of the Z travel.
5. Using a 5/8-inch (16-mm) wrench, turn the Counterbalance Tension Knob clockwise until
the Dispensing Valve is approximately centered in the travel of the Z-carriage.
CAUTION! Avoid over tensioning the Counterbalance Torsion Spring or the Dispensing Head
will move quickly upward when the Dispensing Valve is removed.
TIP Raising the Z-carriage by hand can make it easier to turn the Tension Knob.
6. Hold the wrench in place and tighten the 6-mm Locking Screw.
> If the Counterbalance has been properly adjusted, the Dispensing Valve should hold
its vertical position.
7. Perform a Post-Service Start-up as specified in the Safety section of this manual.