
Installation Manual


Calibration and Adjustment 6-15
4. Close the Hatch and using FmNT Jog Controls, move the Dispensing Head to the back of the
dispensing chamber.
5. If necessary, use FmNT Jog Controls to adjust Conveyor Rail width to fit the sample
production board.
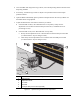
6. Open the Hatch and manually place a production sample board on the Conveyor Belts over
the Board Sensor being adjusted.
7. Adjust the Board Sensor near distance sensitivity as follows:
> If the red LED is OFF (or the “Board Present” bit says OFF), slowly turn the
adjustment screw clockwise until the LED just turns ON (or “Board Present” bit
just changes to ON).
> If the red LED is ON (or the “Board Present” bit says ON):
a. Slowly turn the adjustment screw counterclockwise until the LED just turns OFF
(or “Board Present” bit just changes to OFF).
b. Then slowly turn the adjustment screw clockwise until the LED just turns ON
(or “Board Present” bit just changes to ON).
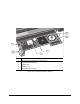
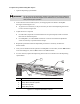
Item Description
1 Board Sensor
2 Adjustment Screw
3 Lift Table
4 Red LED
5 Conveyor Belt (on Front Conveyor Rail)
Figure 6-7 Upward Facing Board Sensor Adjustment
1
4
2
5
3