
Installation Manual


6-12 Calibration and Adjustment
CAUTION! While moving the Camera, always make sure that dispensing head is high
enough to clear all obstacles in the dispense area or damage may occur.
7. Move the Camera over a corner of the white ceramic tile near the Needle Sensor. The video
image should be clear and focused.
> If the image is focused, go to Step 9.
> If the image is not focused, go to Step 8.
8. If the image is not focused, perform the following:
a. Remove the Dispensing Area Front Cover.
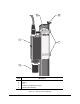
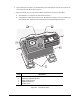
b. Loosen the three 4-mm clamp screws on the sides of the DCM. See Figure 6-6.
c. Adjust the 2.5-mm screws equally until the image of the ceramic tile is focused.
d. View the bubble in the Circular Level and, if necessary, center the bubble by adjusting
the 2.5-mm screws.
e. When the DCM is level, tighten the 4-mm clamp screws.
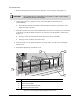
9. Move the Camera over the Purge Station Cover. The video image should be clear and
focused.
> If the image is not focused, repeat Steps 8 and 9.
> If the image is focused and the Circular Level bubble is centered, go to Step 10.
10. Move the Camera back over sample workpiece fiducial, then over the corner of the ceramic
tile, and then over the Purge Station Cover and verify that each location is still in focus.
> If any of the three images is not focused, repeat Step 6 through 10.
> If the image is focused and the Circular Level bubble is centered, the positioning of the
DCM is complete.
11. Reinstall the Dispensing Area Front Cover.