
Installation Manual


Calibration and Adjustment 6-11
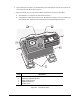
Dispensing Calibration Module Leveling and Height Adjustment
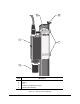
Some X-1000 Series Dispensing Systems include a modular Dispensing Calibration Module (DCM)
located in the front of the dispensing area. The DCM is leveled at the Asymtek factory prior to shipping.
However, it may be necessary to re-level it if the dispensing system has been moved or if any
components have been changed or moved. Table 6-1 describes the component parts of the DCM and
their functions.
Table 6-1 Dispensing Calibration Module Components and Functions
Component Function
Weigh Station
Contains a Scale that measures the weight of dispensed fluid
and sends the information to the FmNT software for mass
flow calibration.
Purge Station
Prepares the dispensing needle for dispensing by cleaning the
outer diameter of the needle and automatically purging the valve
at user-defined intervals.
Needle Sensor
Used with FmNT software to determine dispensing needle
offsets required for accurate dispensing.
Tactile Sensor
Used with FmNT software to calculate the Z-height of the
dispensing needle tip during the Valve Offsets routine.
Ceramic Tile Dispensing substrate used to calculate Camera-to-needle offset.
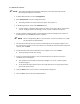
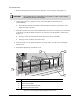
To level and height adjust the DCM:
? NOTE The dispensing system and the Scale must be level before performing this procedure.
1. Put a production sample workpiece at the upstream mouth of the Conveyor.
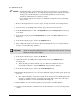
2. In the Main Window, click on Teach a Program.
3. In the Programming Window, click on the
Load a Board icon .
> The workpiece will be conveyed to the dispense area and the Lift Table/Clamp Bar will
bring the workpiece to dispensing height.
4. In the Programming Window, click on the
Video icon .
> The Vision Dialog box opens.
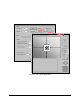
5. In the Vision Dialog box, click on the
Setup Reticles button.
> The Reticle Settings dialog box opens. See Figure 6-2.
6. Using the target box and position controls, move the Camera over the sample workpiece until
the Camera is focused on a fiducial. The video image should be clear and focused. Adjust the
lighting as necessary.
> If the image is not clear and focused, see “Camera Focusing and Calibration” in
this section.