
Installation Manual


6-4 Calibration and Adjustment
To calibrate the Camera:
? NOTE The Camera should be leveled before calibration if it has been removed from the
Dispensing Head and then reinstalled.
1. In FmNT Main Window, click on
Configuration.
2. Select
Setup Vision from the Configuration menu.
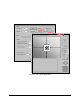
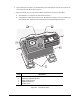
> The Dialog Window for the Vision System opens. See Figure 6-2.
3. In the Dialog Window, click on the
Calibrate button.
> A video window is displayed that includes the video screen, light controls, and position
controls. Prompts lead the user through a series of steps to calibrate the Camera.
4. The first window prompts the user to load a sample production workpiece that contains a
model fiducial. Click on
Next to load the workpiece.
? NOTE See the “Programming Basics, Vision System” section in the FmNT User Guide
for description of model fiducials.
5. The second window asks the user to select a model fiducial on the sample workpiece. Use
the video position controls to move the Camera over the fiducial. When the fiducial has been
selected, click on
Next.
6. The third window asks if the model fiducial is acceptable. If so, click on Next.
> The dispensing head will start moving.
7. At the top of the fourth window, a series of measurements in the X and Y-axes and a
confidence level are displayed.
> The confidence level should be 90 percent and higher. If it is not, contact Asymtek
Technical Support.
> At the end of the measurement routine, the actual dimensions of a single pixel will be
given in the X and Y-axes.
8. Click the
Done button to return to the Vision Parameters dialog box.
9. Click on
OK to return to the FmNT Main Window.