
Installation Manual


6-2 Calibration and Adjustment
Camera Focus Adjustment and Calibration
CAUTION! The following procedures should only be performed by a trained
service technician.
Tools and Materials Needed
• 4-mm Hex Key • Sample workpiece used during a production run
• 5-mm Hex Key
To focus the Camera:
? NOTE The Camera can be focused using both a coarse adjustment and a fine adjustment
depending on the extent of focusing necessary. Usually, only the fine adjustment
is required.
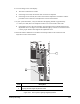
1. To make a coarse focus adjustment, perform the following:
a. Loosen the two 5-mm socket-head cap screws on the back of the vertical Camera
bracket. See Figure 6-1.
CAUTION! While loosening the cap screws, hold the Camera with one hand to ensure that it
does not suddenly slide down to the bottom of the slot in the Camera bracket and
become damaged.
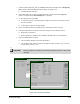
b. While viewing the image in the video window, slide the Camera either up or down in the
bracket until the image becomes clear and focused.
c. When you are satisfied with the coarse focus of the video image, tighten the top 5-mm
screw of the vertical Camera bracket.
> If necessary, perform the fine focus adjustment, as specified in Step 2. Otherwise,
go to Step 3.
2. To make a fine focus adjustment, turn the 4-mm adjustment screw on the top of the Camera
adjustment bar until you are satisfied with the focus of the video image.
3. Tighten the bottom 5-mm screw on the vertical Camera bracket.
CAUTION! Do not operate the dispensing system with the lower screw loose. Loss of focus
and damage to the Camera can result.
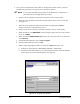
4. Recalibrate the Camera as specified in the next subsection and then perform a Valve Offsets
routine in FmNT.
> Consult FmNT Online Help for assistance, if necessary.