
Owner manual


4-4 Operation
4.3 System Startup
4.3.1 Startup
If necessary, refer to the figures in Section 3 – Component Description to locate system components.
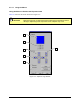
To power on the dispensing system:
1. Verify that the dispensing system hatch is closed.
2. Check the EMO Switches on the front and rear of the dispensing system to see if they have
been activated. If they have been activated, turn the red EMO knob counterclockwise until it
pops out.
3. If not already on, turn the Main Circuit Breaker
ON (I).
The light beacon should display a solid yellow light.
4. Verify the computer and monitor power switches are
ON (I).
The computer and monitor power LEDs should be green. The computer should go into
the boot sequence.
5. Press
ON (I) on the operator’s console.
The green Start button will illuminate and the light beacon will display a green light.
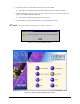
4.3.2 Starting Fluidmove Dispensing Software
The Fluidmove startup procedure assumes that the software is already installed on your computer and that
the computer is turned ON and running Windows.
To start Fluidmove:
1. Click on
Start in the lower left-hand corner of your computer screen.
2. Select
Programs from the Start menu.
3. Select
FmNT or FmXP (as applicable) from the Programs menu.
NOTE Alternatively, you can double-click the Fluidmove icon on the Windows desktop.
CAUTION! Do not press any keys or the mouse while Fluidmove is starting unless prompted
to do so.
Fluidmove will now start. It will check to see that all the Input and Output (I/O) devices
for your dispensing system are communicating properly with the software.