
Owner manual


3-24 Component Description
3.7.3 Probe Adjustments
When a Height Sensor probe is installed, it may be necessary to adjust the Height Sensor such that its
probe is in a position to make accurate measurements. These adjustments include:
• Adjusting the probe height in relation to the needle height
• Adjusting the distance between the probe tip and the needle tip
• Adjusting the upward travel of the probe
Making these adjustments can improve throughput and dispensing quality. Optimal adjustments may vary
with the dispensing pattern, the substrate material, and the needle size.
CAUTION! The Height Sensor should be configured in Fluidmove and the micrometer should
be zeroed before performing any probe adjustments.
Tools and Materials Needed
• 0.050-inch Hex Key
• 7/64-inch Hex Key
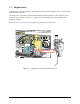
3.7.3.1 Centering the Micrometer Locking Screw
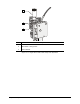
Before making any probe adjustments, the micrometer locking screw (Figure 3-14) should be in a neutral
position that will allow maximum upward or downward adjustment.
NOTE Perform this procedure only if the micrometer locking screw is not centered in the slot.
To center the locking screw:
1. Verify the following:
• The probe is in the down position
• The dispensing head is at the top of its Z-axis travel and at the front of the
dispensing chamber
2. Press
OFF (0) on the operator’s console and open the hatch.
3. Using a 0.050-inch hex key, loosen the micrometer locking screw and turn the micrometer
until the locking screw is centered in the slot. See Figure 3-14.
4. Tighten the micrometer locking screw and proceed with probe adjustments as specified later
in this section.