
Owner manual
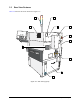


3-18 Component Description
3.6.2 Adjusting Light Level and Color
CAUTION! Except for lighting adjustments and lens replacement, all other configuration and
adjustments should only be performed by a trained service technician.
To adjust lighting intensity and color level:
1. Open the hatch, place a workpiece at the conveyor dispense station, and close the hatch.
You can also place a workpiece at the upstream conveyor port and click on the Load a
Board icon
in the Fluidmove Programming Window.
2. Access the Jog Window using one of the following methods:
Select
Jog from the Main Menu.
Click the Jog
button in the Production Window.
Press
[Ctrl]+[J] on the keyboard.
3. At the bottom of the Jog Controls, click on
Video and when the video display screen appears,
click on
Reticles. See Figure 3-9.
4. In the Reticles Setup Window, use the Jog Controls to move the dispensing head over the
sample workpiece so that the video display reticles are aligned with a fiducial. See
Figure 3-9.
5. View the fiducial in the video display screen while adjusting the two lighting controls until
you get the highest contrast between the fiducial and substrate or between the part being
dispensed upon and the surrounding area.
Adjust the brightness and red/blue color balance by vertically moving the control slides
on the right side of the dialog box. Clicking on the light bulb icon
toggles the light
control slide from a linked mode to an unlinked mode that permits up to 255 independent
color level/brightness levels.
NOTE For more information concerning fiducials and video display contrast, refer to the
“Programming Basics” section of the Fluidmove Users Guide (for Windows NT or for
Windows XP, as applicable).