
Owner manual


5-2 Troubleshooting
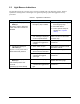
5.3 Light Beacon Indications
The light beacon may be your first clue to solving a problem with your dispensing system. Table 5-1
explains the meaning of the colored lights on a typical dispensing system and suggested recovery
procedures.
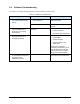
Table 5-1 Light Beacon Indications
Symptom Possible Cause Recovery Procedures
1. Light Beacon displays a
RED light.
All motion, outputs, dispensing
valve, and motion controls are
disabled.
A. Solid – System in an
Emergency Stop condition.
1. Remedy problem causing
the Emergency Stop.
2. Reset EMO button.
3. Perform system startup as
specified in 4.3 System
Startup.
B. Flashing – Software driven
error message is displayed
on the Computer Monitor.
Respond to error message.
Refer to Fluidmove User Guide
or Online Help.
C. Custom-programmed
condition has triggered the
red light.
Refer to programmer’s recovery
procedures.
2. Light Beacon displays a
YELLOW light.
System in a low power state or
lacks sufficient air pressure.
A. Solid – Hatch is open. Close hatch. Production run will
start where it left off.
B. Flashing – Low-pressure
Sensor has been activated.
Check facility air supply.
C. Custom-programmed
condition has triggered
yellow light.
Refer to programmer’s recovery
procedures.
3. Light Beacon displays a
BLUE light.
User-defined problem has
occurred.
(Flashing Light is the Default)
A. Low fluid level in syringe. System needs attention.
Replace with new syringe.
B. Custom-programmed
condition has triggered blue
light.
Refer to programmer’s recovery
procedures.