
Quick Operations Owner's manual


5-10 Maintenance
Replacing a Height Sensor Probe
" NOTE Each valve used on the X-1000 Series Dispensing System has a specific Height Sensor
probe. If you change from one Dispensing Valve to another, you may also need to
change the Height Sensor probe. Contact Asymtek for additional information.
Tools and Materials Needed
• 0.050-inch Hex Key • Replacement Height Sensor Probe (Table 5-3)
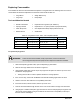
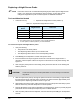
Table 5-3 Replacement Height Sensor Probes
Dispensing Valve
Series
Height Sensor Probe P/N
DJ-2000 HS-DJ-DB09 03-5201-01
DP HS-DP-DB09 195507
DV and DJ-9000 HS-DV-DB09 03-0268-20
All All 03-0267-20 (Straight Probe)
(1)
Notes:
(1) This optional probe may be required for use in special applications.
2. To order probes, contact Asymtek or your local distributor.
To remove and replace the Height Sensor probe:
1. Verify the following:
• The probe is in the down position.
• The Dispensing Head is at the top of its Z-axis travel.
• The Dispensing Head is at the front of the dispensing chamber.
2. Press OFF (0) on the Operator’s Console and open the Hatch.
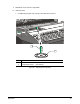
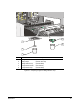
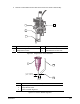
3. Insert a 0.050-inch hex key through the access hole in the side of the Height Sensor. If
necessary, rotate the probe until the hex key fits into the setscrew on the probe bushing. See
Figure 5-4.
4. After noting the probe position in the bushing, slowly loosen the setscrew on the bushing and
slide the probe out.
CAUTION! Loosen the setscrew just until the probe slides out of the bushing or the setscrew
may fall out.
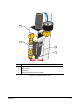
5. Slide the replacement probe up through the probe block and into the bushing in approximately
the same position as the removed probe. The bend in the probe should be approximately even
with the tip of the dispensing needle as shown in Figure 5-5.
6. While holding the probe in place, tighten the setscrew just until the probe is held firmly in place.
Remove the hex key and rotate the probe to its former position.
7. Perform adjustments of the probe as specified in the Height Sensor section to precisely align the
probe bend with the needle tip and adjust the probe-to-needle distance.
8. After the probe position has been adjusted, close the Hatch and press ON (l) on the Operator’s
Console.