
Quick Operations Owner's manual

5-4 Maintenance
Replacing Consumables
Consumables are items that are discarded and replaced on a regular basis. The following items are common
consumables and should be replaced at the intervals recommended in Table 5-1:
• Purge Boots • Weigh Station Cup
• Purge Cup • Banjo Wiper
Tools and Materials Needed
• Needle-nosed Pliers • Replacement Purge Boot (see Table 5-2)
• Isopropyl Alcohol • Replacement 1 oz. (29 ml) Plastic Cups (P/N 58-0030)
• Clean Shop Cloth • One Replacement Banjo Wiper (P/N 02-1570-03)
• Rubber Gloves • Small Brush
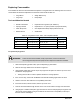
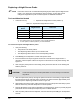
Table 5-2 Purge Boot Colors, Sizes, and Compatible Needles
Purge Boot Color Inside Diameter Compatible Needle Gages Asymtek P/N
Orange 0.5 mm (0.020 in.) 26, 27, 30, 32 01-0019-00
Pink 0.8 mm (0.031 in.) 22, 23, 24, 25 01-0021-00
Green 1.1 mm (0.045 in.) 19, 20, 21 01-0018-00
Olive* 3.0 mm (0.120 in.) 14, 15, 16, 18 01-0022-00
*Recommended size for nozzles on DJ-2000 and DJ-9000 Series Dispensing Valves.
To replace the purge boot:
WARNING!
Follow all manufacturer MSDS, facility requirements, and local ordinances
concerning personal protective equipment and disposal of hazardous materials.
1. When the dispensing system is idle, open the dispensing system Hatch.
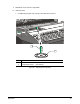
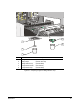
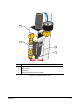
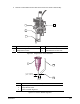
2. Remove the Purge Station Cover as shown in Figure 5-1.
3. Using needle-nosed pliers, grip the top of the purge boot and pull it out from the top of the cover.
Discard the used purge boot.
! Tearing the boot will not cause a problem because it is being replaced.
4. If the cover is dirty, clean it with the MSDS recommended cleaning agent and a soft cloth.
5. Obtain a new boot. See Table 5-2 for compatibility information.
6. Insert the new boot, narrow end first, into the top of the cover.
7. Push the boot downward through the hole in the cover until it starts to emerge from the bottom.
8. Using fingers or needle-nosed pliers, grip the bottom of the boot and pull gently through the hole
until it is fully seated. Slight scoring on the bottom end of the boot is acceptable, but the top of
the boot must be undamaged.