
User guide
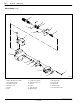


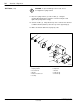
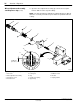
Table Of Contents

AccuJet
Dispenser
35
1998 Nordson Corporation
All rights reserved
107 142B
Issued 4/98
Manual 12-34
See Figure 9.
CAUTION: To prevent damage to the seat assembly, install a
nozzle on the dispenser.
1.Install the cap (6) on the upper body (8) and secure using the
fillisterscrews (9).
2.Place the compression spring (7) on the spring retainer (11).
3.Make sure the locking nut (5) is installed on the preload screw (4).
NOTE: If desired, use the spanner wrench to install the preload screw.
4.Install the preload screw (4) in the cap (6). Tighten the
preloadscrew(4) until the spring touches the top of the preload
screw. Look through the slot to see the point of contact.
a.Note the graduation (number) of the preload screw in relation to
the line on the end cap. This identifies the point of reference.
b.Turn the preload screw to the desired number of turns (Refer to
Table 2 for settings).
5.Lock the locking nut (5) to the face of the upper body (8).
NOTE: Perform the next step if the micro-adjustment assembly has been
replaced or removed from the preload screw.
6.Turn the micro-adjustment assembly (2) counterclockwise to increase
the setting.
7.Insert the micro-adjustment assembly (2) in the preload screw (4).
Secure the assembly using the preload set screws (3).
8.Turn the micro-adjustment assembly (2) clockwise until it bottoms out
against the top of the needle (10).
9.Loosen the micro-adjustment assembly set screw (1) with the hex key
and adjust the assembly to indicate zero. Tighten the set screw.
10.Turn the micro-adjustment to gently seat the needle (10) into the
extension.
Micro-Adjustment Assembly
and Dispenser Cap