
User guide
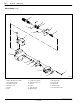

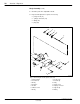

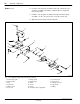
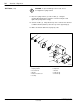
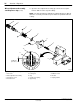
Table Of Contents

AccuJet
t
Dispenser
29
E1998 Nordson Corporation
All rights reserved
107 142B
Issued 4/98
Manual 12-34
Body Assembly
CAUTION: To prevent damage to the ball and needle, do not
use tools to grip the needle threads.
1.See Figure 5. Remove the screws (5) securing the cap (6) to the
upper body (15). Remove the compression spring (7).
2.See Figure 6. Remove the fillister screws (6) securing the
lowerbody(9) to the upper body (13).
3.Carefully push the needle (5) out of the body assembly.
4.Inspect the needle (5) and the air piston (4) for damage. If the air
piston is damaged (such as folds in the seal or the seal rotates in its
metal housing), perform the following steps:
a.Remove the spring retainer (1) from the needle (5). Use a wrench
to hold the top of the seal lock nut (2). Use another wrench to
loosen and remove the retainer.
b.Remove the seal lock nut (2) from the needle (5).
c.Remove the air piston (4) from the seal lock nut (2). Replace the
air piston. Refer to
Assembly, Air Piston
in this manual.
d.Inspect the O-ring (3) on the seal lock nut (2) for damage.
Replace the O-ring, if necessary.
5.Remove the O-ring (7) from the lower body (9) and clean all adhesive
from the cavities.
6.Inspect the U-cup seals (8) in the lower and upper bodies (9, 13). Do
not remove them unless
Sthey are damaged
Sair or fluid leaks from the upper body weep hole.
7.If the U-cup seals (8) are damaged, remove them from the lower and
upper bodies (9, 13) using the ring and seal insertion tool.
CAUTION: Do not use a U-cup seal once it has been removed
from the dispenser. Removing a U-cup seal may damage it,
and cause fluid to leak from the dispenser.