
User guide
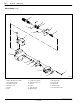

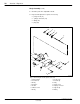

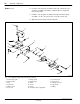
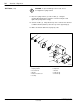
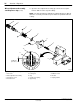
Table Of Contents
AccuJet
t
Dispenser
27
E1998 Nordson Corporation
All rights reserved
107 142B
Issued 4/98
Manual 12-34
The following paragraphs provide disassembly procedures for the
AccuJet dispenser.
Micro-Adjustment Assembly
See Figure 5.
CAUTION: Back off the micro-adjustment assembly to prevent
damage to the needle and seat during assembly.
1.Inspect the micro-adjustment assembly (1) for damage:
SIf damaged, loosen the preload set screws (2) and replace the
assembly.
SIf no damage is found, turn the micro-adjustment 4–6 turns
counterclockwise to increase its setting.
2.Note the preload screw setting. Using the spanner wrench, loosen
the preload locking nut (3). Loosen and remove the preload screw (4)
and the micro-adjustment assembly (1), counting the number of turns
it takes to release contact on the spring.
Solenoid Valve
Remove the socket head screws (17) securing the solenoid valve (16) to
the upper body (15).
Heater
CAUTION: Back off the micro-adjustment assembly to prevent
damage to the needle and seat during assembly.
1.Remove the nozzle (9). Place the nozzle in an appropriate cleaning
solution.
2.Remove the socket head screws (8) securing the heater (10) and
seat extension (11) to the lower body (14). Replace the heater if it is
defective.
3.Clean and inspect the O-rings (12, 13). Replace the O-rings, if
defective.
Disassembly