
User guide

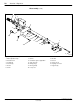
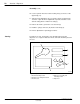
Table Of Contents

AccuJet
Dispenser
21
1998 Nordson Corporation
All rights reserved
107 142B
Issued 4/98
Manual 12-34
Assembly
CAUTION: To prevent damage to the seat, make sure that the
micro-adjust is opened 4–6 turns.
NOTE: Assemble the AccuJet dispenser on a flat surface. The screws
should be tightened to 0.3–0.6 N•m (3–5 lb-in.) except where noted in
the assembly instructions.
1.See Figure 3. Insert the O-ring (11) into the lower body (4).
2.Carefully install the lower body (4) on the upper body (17) and secure
using the screws (14).
3.Install the purge screw (15) into lower body (4). Tighten the purge
screw securely.
4.Apply conductive grease (8) on the seat extension (9) as illustrated.
Do not put grease on the threads.
5.Insert the seat extension (9) into the heater (5). Rotate the seat
extension to spread the conductive grease evenly and remove air
pockets.
6.Install the O-ring (10) on the seat extension (9).
NOTE: Make sure that the dowel-pin hole on the heater extension faces
toward the backside of the applicator.
7.Install the seat extension assembly on the upper and lower body
assembly using the screws (6). Use the
7
/
64
-in. hex key to tighten the
screws.
8.Wipe off the extension threads to remove any grease. Screw the
nozzle (7) onto the extension and hand tighten.
9.Tighten the preload screw (2) until the spring touches the top of the
preload screw. Look through the slot to see the point of contact.
a.Note the graduation (number) of the preload screw in relation to
the line on the end cap. This identifies the point of reference.
b.Turn the preload screw to the desired number of turns (Refer to
Table 2 for settings).