
User guide

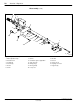
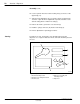
Table Of Contents

AccuJet
t
Dispenser
19
E1998 Nordson Corporation
All rights reserved
107 142B
Issued 4/98
Manual 12-34
Disassembly
1.See Figure 3. Turn the micro-adjust cap (1) 4 to 5 turns
counterclockwise.
2.Use the spanner wrench to loosen the locking nut (3). Turn the
preload screw (2) to relieve compression on the spring.
3.Use the
7
/
64
-in. hex key to remove the screws (6) securing the
heater(5) and the seat extension (9) to the lower body (4). Separate
the extension from the heater. Either discard the O-ring (10) or wipe
it with a towel.
4.Use the screwdriver to remove the screws (14) from the
lowerbody(4). Carefully pull the lower body off of the needle (13).
5.Remove the O-ring (11) which holds the seal in place. Clean the
O-ring with a solvent or replace it.
6.If adhesive on the needle is within 0.25 mm (0.1 in.) of the
upperbody(17),
Sreplace the U-cup seal (12)
Sinspect the needle (13) for excessive wear and replace if
necessary
7.Remove the purge screw (15) and syringe connector (16) from the
lower body (4).
8.Use a cotton swab to remove excess adhesive from the
Sseat extension (9)
Slower body (4)
Ssyringe connector (16)
Use a cotton swab and the recommended solvent for the adhesive to
clean these parts. Clean the parts in a solvent bath and ultrasonic
cleaner.
9.Wipe the needle (13) and purge screw (15) with a solvent-soaked
disposable towel.
10.Use an air gun to blow excess adhesive from the dispenser fluid
paths into a disposable towel.
11.Clean the dispenser with solvent in ultra-sonic cleaner or by flushing.
12.Inspect the parts to ensure they are solvent and adhesive-free.