
User guide
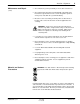
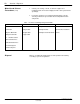
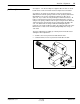
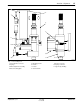
Table Of Contents

AccuJet
t
Dispenser
16
E1998 Nordson Corporation
All rights reserved
107 142B
Issued 4/98
Manual 12-34
WARNING: Allow only qualified personnel to perform the
following tasks. Follow the safety instructions in this document
and all other related documentation.
NOTE: Operation of the dispenser is dependent upon the workcell.
Consult your Nordson representative if more information is necessary.
1.Turn on the supply air to your workcell.
2.Set the solenoid air pressure to 5.5 bar (80 psi) and check for leaks.
3.See Figure 2. Remove the nozzle (6).
NOTE: The solenoid valve has a push button that you can press for
manual activation.
4.Verify that the dispenser needle functions properly:
SEither manually or electrically activate the solenoid valve (8) and
listen for the needle to make contact with the microadjust stop.
5.Connect a syringe (2) of adhesive to the syringe connector (10).
6.Set the syringe pressure to 1.7 bar (25 psi).
7.Turn on the heater controller. Allow 4–5 minutes for the temperature
to reach its set point before starting the dispenser.
8.Either manually or electrically activate the solenoid valve (8) until
adhesive begins to flow out of the nozzle extension.
9.Wipe the adhesive from the end of the nozzle extension. Screw the
nozzle (6) onto the heater (7). Use the Nordson torque wrench to
tighten the nozzle to 1.7–2.2 N•m (15–19 lb-in.). The torque wrench
will click when the proper torque is achieved.
10.Set the syringe pressure to the recommended setting for your
adhesive. The syringe pressure is typically 1.2–1.7 bar (18–25 psi).
11.Use Table 2 to record your set-points.
4. Operation