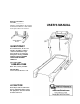
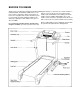
Model No. NTL07806.2 Serial No.___________ Find the serial number in the location shown below. Write the serial number in the space above for reference. Serial Number Decal QUESTIONS? As a manufacturer, we are com mitted to providing complete customer satisfaction. If you have questions, or if parts are damaged or missing, PLEASE CONTACT OUR CUSTOMER SERVICE DEPARTMENT DIRECTLY. CALL TOLL-FREE: 1-888-825-2588 Mon.~FrL, 6 a.m.-6 p.m. MST ON THE WEB: ordì ctrackservice .com WWW.
TABLE OF CONTENTS IMPORTANT PRECAUTIONS.........................................................................................................................3 BEFORE YOU BEGIN..................................................................................................................................... 5 ASSEMBLY .....................................................................................................................................................6 OPERATION AND ADJUSTMENT .............
IMPORTANT PRECAUTIONS AWARNING ^Tb reduce the risk of burns, fire, electric shock, or injury to persons, read the following Impprlant precautions and information before operating the treadmill. 1. It is the responsibility of the owner to ensure that ajl users of this treadmill are adequately informed of all warnings and precautions. 2. Use thé treadmillonly as described. 3. Place the treadrriill on a level surface, with at least eight feet of clearance behind it and two feet oh each side.
22. When folding òr moving the treadmiil, niake : sure that thé storage latch is fully closed. 26. inspect and properiy tighten ail parts of the treadmill regularly. 23. When using ¡FIT cards, an electronic “chirp ing” sound will alert you when the speed and/or incljne of the treadmill is about to change. Aiways iisten for thè “chirp“ and be prepared for speed and/or incline changes. In some instances, the speed and/or incline may ; change before the personal trainer describes the chèngè. ...........
BEFORE YOU BEGIN Thank you for selecting the revolutionary NordicTrack® ing this manual, see the front cover of this manual. To C2255 treadmill. The C2255 treadmill offers a selec help us assist you, please note the product model tion of features designed to make your workouts at number and serial number before calling. The mode! home more enjoyable and effective. And when you’re number of the treadmill is NTL07806.
ASSEMBLY Assembly requires two persons. Set the treadmill in a cleared area and remove all packing materials. Do not dispose of the packing materials until assembly is completed. Note; The underside of the treadmill walking belt is coated with high-performance lubricant. During shipping, a small amount of lubricant may be transferred to the top of the walking belt or the shipping carton. This is a normal condition and does not affect treadmiii performance.
2. Insert the other Extension Leg (97) into the indi cated bracket on the base of the Uprights (85) as shown. Attach the Extension Leg (97) with two Extension Leg Boits (87), two Star Washers (67), and two Extension Leg Nuts (91) as shown. Firmly tighten the Extension Leg Bolts. 3. Attach the four Base Pads (81) to the base of the Uprights (85) in the indicated locations with four 1" Тек Screws (82) and four Plastic Washers (101). Note: One replacement Base Pad may be included.
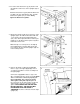
5. With the help of a second person, set the con sole assembly on the Uprights (85). Make sure that no wires are pinched. Attach the console assembly with four Console Bolts (72) and four Star Washers (67). Start ail four Console Bolts before tightening any of them. 6. Press the Latch Insert (77) into the right side of the left Upright (85). and press the Knob Insert (92) into the left side of the left Upright. Use a rubber mallet, if necessary. Remove the knob from the pin.
OPERATION AND ADJUSTMENT THE PRE-LUBRICATED WALKING BELT tric shock. This product is equipped with a cord having an equipment-grounding conductor and a grounding Your treadmill features a walking belt coated with high plug. Plug the power cord into a surge suppressor, performance lubricant. IMPORTANT: Never apply sil and plug the surge suppressor into an appropriate icone spray or other substances to the walking belt or the walking platform.
FEATURES OF THE CONSOLE workout programs designed to help you achieve spe cific fitness goals. For example, lose unwanted pounds The treadmill console offers an impressive array of with the 8-week Weight Loss program, or train for a features designed to help you get the most from your long-distance run with the Marathon program. iFIT pro workouts.
HOW TO TURN ON THE POWER Each time a button is pressed, the speed set ting will change by 0.1 mph; if a button is held down, the speed setting will change in incre ments of 0.5 mph. Note: After the buttons are pressed, it may take a moment for the walking belt to reach the selected speed setting. Note: To prevent damage to the walking platform, always wear clean shoes while using the treadmill. Plug in the power cord (see page 9).
The Training Zones display—This display Note: The console can display speed and dis tance in either miles or kilometers. To change the unit of measurement, see THE USER’S MODE on page 18. Note: For simplicity, all instructions in indicates the approxi mate intensity levei of your exercise. If five or six indicators are iit, for example, the display shows that your pace is ideal for aerobic exercise. this section refer to miles.
B Turn on the fan If desired. To turn on the fan at low speed, press the Fan button; the word "LOW” will appear in the matrix for a tew seconds. To turn on the fan at high speed, press the button a second time; the word “HIGH” will appear in the matrix. To select the auto mode, press the button again; the word “AUTO" will appear in the matrix. When the auto mode is selected, the speed of the fan will automatically increase and decrease as the speed of the walking belt in creases and decreases.
(The incline settings are not shown in the matrix.) The speed settings for the following segments will be shown in the columns to the right. HOW TO USE A PRESET PROGRAM Insert the key into the console. When only three seconds remain in the first seg ment of the program, both the Current Segment column and the column to the right will flash and a series of tones will sound.
Follow your progress with the displays. m See step 5 on page 11. Measure your heart rate if desired. A moment after the button is pressed, the walking belt will begin to move. Hold the handrails and begin walking. See step 6 on page 12. 1^^ Turn on the fan if desired. See the matrix. Each custom pro gram is divided into one-minute segments. One speed setting and one incline set ting can be programmed for each segment.
speed setting and/or the incline setting will flash in the displays to alert you. HOW TO USE A CUSTOM PROGRAM D Insert the key into the console. When the first segment is completed, all speed settings will move one column to the left. The speed setting for the second segment will then be shown in the flashing Current Segment column and the treadmill will automatically adjust to the speed and incline settings for the second segment. See HOW TO TURN ON THE POWER on page 11.
incline settings of the program. Hold the handrails and begin walking. HOW TO USE AN IFIT CARD Insert the key Into the console. During the program, a personal trainer will guide you through the workout. You can adjust the vol ume or select an audio setting for your personal trainer (see THE USER’S MODE on page 18). See HOW TO TURN ON THE POWER on page 11, Insert an ¡FIT Card and select a program.
When you use an iFIT Card, a personal trainer will guide The console features a user’s mode that keeps track of you through your workouts the total number of miles that the walking belt has and give detailed instructions moved and the total number of hours that the treadmill if “P” is selected as the audio has been operated. The user’s mode also allows you setting.
THE OPTIONAL CHEST PULSE SENSOR HOW TO ADJUST THE CUSHIONING SYSTEM An optional chest pulse sensor offers hands-free oper The treadmill features a cushioning system that re ation as it monitors your heart rate during your work duces the impact as you walk or run on the treadmill. outs.
HOW TO FOLD AND MOVE THE TREADMILL HOW TO FOLD THE TREADMILL FOR STORAGE Before folding the treadmill, adjust the incline to the lowest position. If this is not done, the treadmill may be per manently damaged. Remove the key and unplug the power cord. CAUTION: You must be able to safely lift 45 pounds (20 kg) to raise, lower, or move the treadmill. 1. Hold the metal frame firmly in the location shown by the arrow at the right.
HOW TO LOWER THE TREADMILL FOR USE 1. Hold the upper end of the treadmill with your right hand as shown. Using your left hand, pul! the latch knob to the left and hold it. Pivot the frame down until it is past the pin on the latch knob. 2. Hold the metal frame firmly with both hands, and lower It to the floor. CAUTION: To decrease the possibility of injury, do not lower the frame by gripping only the plastic foot rails. Do not drop the frame to the floor.
TROUBLESHOOTING Most treadmill problems can be solved by following the steps below. Find the symptom that applies, and follow the steps listed. If further assistance is needed, please see the front cover of this manual. PROBLEM: The power does not turn on SOLUTION: a. Make sure that the power cord is plugged into a surge suppressor, and that the surge suppressor is piugged into a properly grounded outlet (see page 9).
Locate the Reed Switch (22) and the Magnet (18) on the left side of the Pulley (17). Turn the Pulley until the Magnet is aligned with the Reed Switch. Make sure that the gap between the Magnet and the Reed Switch is about 1/8”. If necessary, move the Reed Switch slightly using a slotted screwdriver. Reattach the Motor Hood (not shown), making sure that the 3/4” Screws (not shown) are inserted into the same holes from which they were removed.
PROBLEM: The incline of the treadmili does not change correctly SOLUTION: a. With the key in the console, press one of the Incline buttons. While the incline is changing, re move the key. After a few seconds, re-insert the key. The treadmill will automatically rise to the maximum incline level and then return to the minimum level. This will recalibrate the incline sys tem.
CONDITIONING GUIDELINES AWARNING: Before beginning this or any exercise program, consult your physi cian. This is especiaily important for individu áis over the age of 35 or individuáis with pre existing health problems. The pulse sensor is not a medicai device. Varióüs factors, ihciuding your movement, may affect the accuracy of heart rate readings. The sensor is intended only as an exercise aid in determining heart rate trends in general. uses easily accessible carbohydrate catoriesSox en ergy.
PART LIST—Model No. NTL07806.2 R0806A To locate the parts listed below, see the EXPLODED DRAWING starting on page 28. у No. Qty.
Key No. Qty. 103 104 105 106 # # 1 4 1 1 1 1 Description Key/Clip Isolator Screw/Bracket Screw Console ¡FIT Wire 12" Blue Wire, 2F 8" Blue Wire, M/F Key No. Qty. #1 #1 #1 Description 8" Green Wire, F/Ring 4" Red Wire, M/F User's Manual #These parts are not illustrated. Specifications are subject to change wit ORDERING REPLACEMENT PARTS To order replacement parts, see the front cover of this manual.
EXPLODED DRAWING A—Model No. NTL07806.
EXPLODED DRAWING B—Model No. NTL07806.
EXPLODED DRAWING C—Model No. NTL07806.
EXPLODED DRAWING D—Model No. NTL07806.
LIMITED WARRANTY WHAT IS COVERED—The entire NordicTrack C2255 treadmill (“Product”) is warranted to be free of all defects in mate rial and workmanship. WHO IS COVERED—The original purchaser or any person receiving the Product as a gift from the original purchaser. HOW LONG IS IT COVERED—ICON Health & Fitness, Inc. (“ICON”), warrants the drive motor for life. Parts and labor are warranted tor one year from the date of purchase.