
Manual


1
09/11 Rev. B 138709
LABORATORY FREEZER
Installation, Operation and
Maintenance Instructions
INSPECTION
When the equipment is received, all items should be carefully checked against the bill of lading to
insure all crates and cartons have been received. All units should be inspected for concealed
damage by uncrating the units immediately. If any damage is found, it should be reported to the
carrier at once, and a claim should be filed with the carrier. This equipment has been inspected and
tested at the manufacturing facility and has been crated in accordance with transportation rules and
guidelines. Manufacturer is not responsible for freight loss or damage.
Before connecting the refrigerator to the power supply, let it stand for approximately two hours to
reduce the possibility of malfunctions in the cooling system due to transport handling.
INSTALLATION
GENERAL
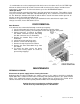
After the unit crate and crate base have been removed, ensure that the cabinet is level. All four
corners of the unit must rest firmly on a solid floor. The cabinet is equipped with adjustable front feet
to level the unit. Refer to the illustration below for adjustment of feet. Raise the front of the cabinet
enough so that the doors will close freely when opened halfway. The cabinet should slope ¼” to ½”
from front to back. Then level the cabinet from side to side.
Note: It is extremely important that the freezer
be level in order to function properly. If the
freezer is not properly leveled during
installation, the door may be misaligned and
not close or seal properly causing cooling,
frost or moisture problems.
Choose a location near a grounded electrical
outlet. Do not install the freezer where the
temperature will rise above 110°F (43°C).
Temperatures below 32°F (0°C) will not affect
freezer operation. Allow adequate space
around the unit for good air circulation.
A minimum of 3 inch (75 mm) space on the
sides and top and 3 inch (75 mm) space at
the back of the freezer is required for
adequate air circulation.