
Use and Care Manual


14
Good advice for a quick and perfect assembly of the greenhouse from KGT
Most of the assembly can be done by you alone. The assembly for gable and lateral walls takes 2 – 4
hours according to your skills. It is best if you have further two persons being able to hold it for approx.
half an hour when putting the greenhouse upright.
If you want to go on mounting it alone you have to look for a secure, suitable mounting course by means
of stay bars, ladder or other xings.
Unlike the most usual greenhouses, the mounting of the aluminum proles is done together with
the glazing. This results into an absolutely secure glazing and the biggest possible stability of the
greenhouse.
You obtained 3 to 5 boxes depending on the greenhouse.
1 x basic kit → contents see p. 6 + 7
1 x windows and doors → contents see p. 8 – 11
1 x glazing (for bigger houses 2 boxes)
Please stay all the boxes in a dry place and protected against sunlight (see note below).
Please rst open and unpack only the main box with the basic kit to avoid a mixing of the many different
parts.
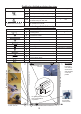
Please start with the assembly of the greenhouse gables. Door wall gable and back wall gable are
nearly the same.
Push the prole of the frame of doors pos. 1.6 –right- and pos. 1.7 –left- (prole with 8 borings with a
slope of 30° as well as a black PVC-glider) up to the smaller borings in the centre of the oor prole.
The slopes there have to point to the outside direction. Then detach the angle brackets pos. 1 (see step
1).
Already now you need the small lateral glazing (measurements see table*). Push it with the web
direction – vertical – into the oor prole and push laterally into the prole of the frame of doors (see
step 2).
Important note:
The ISO-cellular sheets, that is the glazing, are always to build in with the UV-coated side to the outside.
On the protection foil you nd a corresponding note or a blue foil. Loosen the protection foils only at the
edge and the complete rest of the foil only after the nished assembly . With some days of insolation
the foil can burn "tight" on the plates and is to stripe off with difculty.
Do not stripe it completely off when unpacking the goods because then you cannot see the side with
the UV-protection.
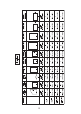
Now detach the crossbeam pos. 1.9 from the top onto the glazing (see step 3). Then the beveled glazing
is to put in the same way. Joint the frame of doors with the connection plate pos. 2 (see step 4).
Attention!
In advance 2 screws have to be screwed in both vertical frames of doors and 2 screws into the
horizontal frame of doors.
*Rose *Orchidee
730 x 728 1048 x 728