Hempasense Track User Manual
Hempasense Track Version 1.
Table of contents HEMPASENSE TRACK USER MANUAL ............................................................................. 4 INTRODUCTION ..................................................................................................................... 4 Process .............................................................................................................................................................. 4 HARDWARE .........................................................................
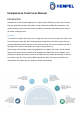
Hempasense Track User Manual Introduction Hempasense Track enables applicators to improve their efficiency to win more business, improve application quality, and reduce costly claims with credible documentation. The system monitors precise environmental conditions around the asset during each step of the entire coating process. Process The solution is simple and easy to use.
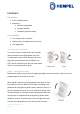
Hardware Parameters 1. ATEX certified sensor 2. Measures: a. Ambient temperature b. Relative humidity c. Vibrations (accelerometer) Functionalities 1. Turn sleep mode on and off 2. Shake sensor to register start of process 3. LED light guide Turn sleep mode on and off To put the sensor in sleep mode, turn it upside down and wait for blue light flashes one LED To wake up the sensor from sleep mode, turn it right side up and wait for blue fast flashes on LED.
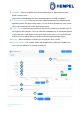
cured, then shake the sensor to indicate the job is done. Turn the sensor upside down to put it into sleep mode. The sensor can now be assigned to a new job. After each shake, the LED on the bottom of the sensor either blinks green or red to indicate whether the shake was accepted or not. It is always possible to see the current job status in the mobile app and web app. Use this feature to ensure the shakes have been recorded properly. LED light guide The LED light can be seen on the bottom of the sensor.
3 slow red blinks – device does not accept the shake, as not enough time has passed since the last shake. This prevents accidental ‘double’ shakes. Please check the status of the job in the mobile app immediately to ensure you are on track with the process. To record next phase, wait a few seconds before shaking again. It is always possible to “undo” a shake/ go back one step in the job status by using the progress buttons in the mobile app. Yellow flash every 30 sec. – device is awake and monitoring.
6. Settings – Click here to go to the Settings page. 6 1 2 5 3 4 Create Job/Edit Job page To set up a new job, fill out the boxes using the given specification. 1. Job ID – Give the job a specific ID. This might be related to your other digital systems. 2. Customer – Either choose from the dropdown menu, or create a new. 3. Description – Here you can manually enter the paint system – typically found in the specification. Either choose from the dropdown menu, or create a new. 4.
8. Template – Select a template from the dropdown menu to add needed custom fields or select “none”. (See section Settings page for more information about creating a template) 9. Executive Summary – Here you can enter a quick summary of the job performed, appearing on the first page of the report. You can fill this information in now or wait till the job is finished, just before generating a report. 10.
Job page After having created a new job or selected a job from the home menu, you will see the Job page. To the right you can see the specifications for the job and to the right you can see the actual status of the coats included in the job. 1. Job status - This status indicates the process the coat is currently at. Status will start at “Pending” and move onwards to “Coating”, “Drying” and “Done”. When shaking the sensor the status will change. 2.
9. Delete – If needed, this will permanently delete the job. 2 6 1 5 3 9 7 8 4 Settings page On the Settings page you can customize the report layout, insert your logo and choose your regional format of time and temperature. Moreover, you should add equipment to be used during jobs for measuring surface temperature, WFT and DFT. The equipment added here will be saved to your list of equipment that you always can choose from. 1.
4. Temperature format – Choose whether you want to report using Celsius or Fahrenheit temperatures. 5. Time format – Choose whether you want to report using 24hour format or 12hour format (AM/PM) 6. Brand logo – Here you can upload your company logo. It will be featured on the front page of the report. 7. Colors – Here you can choose the colours you would like the customer report to primarily feature. This could for example be your company colours.
9 2 1 3 5 4 6 7 8 Custom fields Custom fields gives you an opportunity to capture relevant information for different stages of the job. You decide what additional information would be valuable for your company to document as a part of the final Hempasense Track quality report. The custom fields added via the web app under “Settings” will be applicable for your different jobs in the form of a template.
custom field category. The labels added to your list of custom fields can later be sorted in templates. 1. Label name – Enter relevant areas or factors you would like to include values for during the job and press “+”. The labels can be categorised into four different areas of the job process: a. Surface preparation – Methods and information regarding preparation of the surface for example related to cleaning or blasting done prior application. b.
31 21 1a 1b a 1c a 1d a Templates From your lists of custom fields divided into Surface preparation, Pre application, Post application and Per coat you can create specific templates. When creating a new job, select the suitable templates from your list and the custom field labels will automatically be incorporated to the job process for you to manually specify values for. Creating a new job you Hempasense Track Version 1.
should choose to assign a template for the entire job, or you can choose not to select any template. Notice: when a template has been assigned to a job, you cannot add or edit in the labels for that specific job neither can you go back and add a template later in the process of that specific job. 1. Template name – Name the template you are about to create. 2. Select label – Add from the drop down menu labels you want to include in the template for the specific categories.
6. Navigation buttons - Arrows and delete button allow you to move the label up and down and thereby edit the custom field structure in the template. Press “X” to remove the label from the template. 6 Hempasense Track Version 1.
Mobile App Download the Hempasense Track App to your mobile device. The app can be downloaded from App Store or Google Play. Use the same login details from the MyHempel account to enter the jobs created. Use the mobile app to execute the jobs created on MyHempel. The web and mobile app will sync, meaning any values entered in the web app will be visible on the mobile app and vise verse. Profile page On this page you can sign in and sign out of your profile.
4. Custom fields – if the template assigned to the job includes custom field labels for Surface preparation, Pre application and/or Post application, you will find these categories at the bottom of the job info page. Click on the custom field category and a separate page opens with the labels included in your template. Fill in values for the labels during the job. Coat info Click on a coat to expand it and see and specify values for it. To the right Coat 1 is expanded and following details are visible: 1.
4. Per coat – Click on this button to specify values for 4 the custom field labels “Per coat” during the job. Fill out the information for the labels and press “Save”. These per coat labels are reflected in all coats of the job and values should be specified under each coat number. Example to the right includes with 4 labels. 5. Components – Each coat can have multiple components (such as a base, curing agent and thinner). Here you should specify components per coat.
Sensors To get to this page, click the settings-wheel in the top left corner on the mobile app. On this page you can see an overview of all your sensors, and what ambient temperature and relative humidity each of them are currently measuring. You can also see their battery level, and the date of the last received signal – so you can see if all your sensors are working correctly. Notice: you should not change the battery of the sensor at any time.
Hempasense Track Version 1.
Report front page 1. Company logo 1 2. Customer name 3. Job ID 4. Date of report creation 5. Report text 2 3 4 5 Overview Page 2 gives a quick overview of how the application process has been completed, compared to the specification made beforehand and entered when creating the job. 1. Executive summary 1 2. Specification overview a. Product b. DFT/WFT 2 c. Overcoat interval d. Overcoat temp. 3.
Details 1. Instrument details 1 Details about instruments used to collect measurements represented in the report. 2 2. Hempasense Track sensor 3 3. Product details a. Product name b. Batch/lot number 4 c. Product number d. Shade 4. Application details a. Start/Drying/Curing time 5 b. Recoat interval c. DFT/WFT d. Substrate Temp. e. Drying/Curing temp./humidity 5. Per coat details a.
All measurements of ambient temperature and relative humidity for each coat, with timestamps visualized in tables. The data points is based on the pre-set monitoring interval of the sensor assigned to the job. Below the table overview, Post application custom field show the labels from the table included for this custom field category and the values specified. Hempasense Track Version 1.
MyHempel MyHempel is Hempel’s Digital Customer Interface. To set up new jobs and create the Hempasense Track report simply log on your MyHempel account from a web browser. From the MyHempel Home Page you will be able to find the icon Hempasense Track. Click on this icon and you will be presented to the Hempasense Track software, web version. Create new users The main user account can invite colleagues to join the Hempasense Track software.
There are no limitations for the number of User’s who can be invited to your account. For any further questions for MyHempel, go to the FAQ page or contact your local Hempel Sales Representative. Hempasense Track Version 1.
Technical Specifications & Certifications for 868 MHz model Usage : Europe Technical specifications Operating temperature: -20°C to +65°C EN 300 328 BLE Communication EN 300 220 SRD 25 MHz to 1000 MHz Enclosure Materials: • Permanent Antistatic ABS 346A-757 • Transparent TP90 X10_ASTM (light-guide) Battery Operated (3,6 V) SAFT LS14500 (ATEX Approved) Certifications Low Voltage Directive 2014/35/EU Radio Equipment Directive 2014/53/EU Hempasense Track Version 1.
ATEX Hempasense Track is produced in accordance with the requirements of the following standards: • EN IEC 60079-0:2018 • EN 60079-11:2012 • ATEX Directive 2014/34/EU Marking ATEX: II 1G Ex ia IIC Tx Ga Tx - T4 for ambient temp. range up to 45°C - T3 for ambient temp range up to 65°C Certificate number ATEX: OBAC 20 ATEX 0003X Special conditions for safe use • Ambient temperature range is -20°C - +65°C • Battery must not be changed.
Technical Specifications & Certifications for 915 MHz model Usage : North America Technical specifications Operating temperature: -20°C to +65°C Enclosure Materials: • Permanent Antistatic ABS 346A-757 • Transparent TP90 X10_ASTM (light-guide) Battery Operated (3,6 V) SAFT LS14500 (ATEX Approved) Certifications FCC Id : 2AXRV-HT915 Hempasense Track is produced in accordance with the requirements of the following standards: Hempasense Track Version 1.
• EN IEC 60079-0:2018 • EN 60079-11:2012 Marking Special conditions for safe use • Ambient temperature range is -20°C - +65°C • Battery must not be changed. In case of depleted battery, the sensor must be returned to Hempel A/S. See details in sales contract. • The sensor should only be handled by hand. This device complies with part 15 of the FCC Rules.