
User's Manual


Bx4
9
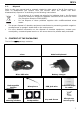
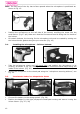
Open the visor.
Remove the rear section of the comfort padding, pulling on the neck roll until it is
released from the shell (see specific instructions in the helmet user manual).Reposition
the padding on the outside of the helmet for the time being. (Fig. 5)
Remove the chin guard by pulling on the special red tab (Fig. 6a), then remove the
plug from the chin guard. (Fig. 6b)
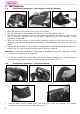
Gently remove the polystyrene cheek pads by pulling them upward. (Fig. 7)
Warning: In case the polystyrene cheek pad is damaged during this operation, please
contact your local dealer to replace it.
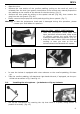
In case the helmet is equipped with noise reducers on the comfort padding, lift them
up.
Take the comfort padding, left-hand and right-hand side and, if equipped, cut the pre-
drilled tab as shown in fig. 9 and fig. 10
3.3. Installing the microphone – jet helmets or flip-up helmets
Set up the microphone by inserting the clip that holds it in place, being careful to
position it correctly. (Fig. 15)
Fig. 8
Only for X701 – X603 - X602 helmets:
Take the polystyrene cheek pads that
have just been removed and, using a pair
of scissors, remove the round insert by
cutting the fabric securing points. (Fig. 8)
Keep the
foam used to cover the speakers
housing in case you wish to use the
helmet without the Bluetooth Kit system.
Fig. 9 - helmets X701 – X603
Fig. 10 - helmet X702
Fig. 15
Fig. 17a