
User's Manual


10
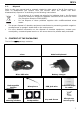
Note: The flat part of the clip has to face upward when the microphone is positioned as
shown in Fig. 15.
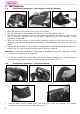
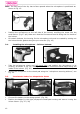
Position the microphone on the left side of the helmet, screwing the screw into the
small frame. (Fig.17 a/b) Make sure that the fluorescent band is facing the the inside of
the helmet.
On certain helmets, the housing for the microphone rod must be created by cutting out
the helmet border gasket along the pre-cut area. (Fig. 18)
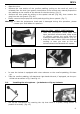
3.4. Installing the microphone – full-face helmets
Take the polystyrene cheek pad (left-hand side) and position the microphone in its
housing, as shown in fig. 19, making sure that the fluorescent band stays facing the
inside of the helmet. (Fig. 20)
Secure the microphone to the cheek pad using the “microphone securing stickers”, see
Fig. 19.
3.5. Inserimento batteria e altoparlante destro
Connect the battery to the wiring system. (Fig. 26)
Position the battery in the right polystyrene cheek pad housing and secure it using the
Velcro ribbon. (Fig. 27 / 28)
Fig. 17b
Fig. 18
Fig. 19
Fig. 20
Fig. 26
Fig. 27
Fig. 28