BX4 EN USER INSTRUCTIONS AND SAFETY Firmware Version: 3.
Congratulations on your purchase of an N-Com product. N-Com BX4 was made using the most advanced technologies and the best materials. Long-running tests and thorough system development have allowed the highest audio quality to be achieved. For additional information about BX4, and to download high-definition instructions as well as the latest Firmware version, visit the website www.n-com.
Bx4 FOR USA MARKET ONLY: SPECIAL WARNING This device complies with part 15 of the FCC and Industry Canada Rules. Operation is subject to the following two conditions: (1) This device may not cause harmful interference, and (2) this device must accept any interference received, including interference that may cause undesired operation. Changes or modifications not expressly approved by the party responsible for compliance could void the user’s authority to operate the equipment.
Contents 1. WARNINGS AND SAFETY ...................................................... 5 1.1.Road safety.......................................................................... 5 1.2.Switching on the system in safe environments ........................... 5 1.3.Interferences ....................................................................... 5 1.4.Appropriate use .................................................................... 5 1.5.Qualified personnel .............................................
BX4 1. WARNINGS AND SAFETY Read this User Manual carefully, as well as the User Manuals for other N-Com kits that you will be using with the N-Com BX4 . Read the simple rules listed below. Failure to comply with these rules may lead to dangerous situations. Caution: The product cannot be used in official or non-official competitions, motordromes, circuits, racing tracks and the like.
Caution: Adjust the volume of the N-Com system (where provided) and of the audio sources connected to it before you use the system on the road. Caution: Adjusting the volume to very high levels may cause damage to your hearing. Caution: Adjust the volume of the N-Com system (where provided) and of the audio sources connected to it so as to avoid audio reproduction at high volumes. Constant exposure to high audio volumes may damage your hearing.
Bx4 1.7. Disposal Refer to this user manual and to manuals related to other parts of the N-Com system in order to disassemble the system from the helmet. Once the system has been disassembled, dispose of it according to the following instructions: The presence of a crossed-out wheelie bin indicates that in the European Union the product is subject to separate collection at the end of its useful life (European Directive 2002/96/EC).
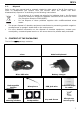
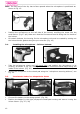
3. INSTALLATION 3.1. Preliminary operations – Jet helmets or Flip-up helmets Fig. 1 Fig. 2 Fig. 3 Open the helmet chin guard (only on Flip-up helmets). Pull out both comfort cheek pads, left and right, from the helmet. (Fig. 1) Remove the noise reducers from the cheek pads (if present) and cut the insert using a pair of scissors, following the pre-cut dots. Reposition the noise reducers in the removable cheek pads.
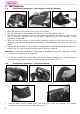
Bx4 Open the visor. Remove the rear section of the comfort padding, pulling on the neck roll until it is released from the shell (see specific instructions in the helmet user manual).Reposition the padding on the outside of the helmet for the time being. (Fig. 5) Remove the chin guard by pulling on the special red tab (Fig. 6a), then remove the plug from the chin guard. (Fig. 6b) Gently remove the polystyrene cheek pads by pulling them upward. (Fig.
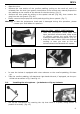
Note: The flat part of the clip has to face upward when the microphone is positioned as shown in Fig. 15. Fig. 17b 3.4. Fig. 18 Position the microphone on the left side of the helmet, screwing the screw into the small frame. (Fig.17 a/b) Make sure that the fluorescent band is facing the the inside of the helmet. On certain helmets, the housing for the microphone rod must be created by cutting out the helmet border gasket along the pre-cut area. (Fig.
Bx4 Fig. 35 Posizionare l’altoparlante destro nell’apposita sede del guanciale e fissarlo utilizzando l’apposito adesivo (Fig. 35). Reposition the right polystyrene cheek pad in its housing. Only for full-face helmets: Insert the chin strap into the polystyrene cheek pad loop. Only for full-face helmets X701 – X603 - X602 – X551 models - Arrange the battery connector behind the polystyrene cheek pad. - Arrange the cable behind the polystyrene shell or inside the relevant housing. Fig.
3.6. Posizionamento dell’e-box Fig. 11 Fig. 12 Fig. 13 Connect the microphone to the e-box Position the e-box in the left polystyrene cheek pad housing Posizionare l’altoparlante sinistro nella sede del guanciale e fissarlo utilizzando l’apposito adesivo (Fig. xx) Nota: PRIMA di riposizionare il guanciale polistirolo sinistro, seguire le istruzioni del capitolo successivo. 3.7. Installing the adhesive keyboard Fig. 11 Fig. 12 Fig.
Bx4 Note: In the event that the keyboard is not positioned correctly, peel it off right away with extreme care and repeat the positioning. Note: It takes up to 24 hours for the keyboard to stick completely. During this time, do not expose the helmet to atmospheric agents. Hook up the “flex” cable of the adhesive keyboard to the e-box Reposition the left polystyrene cheek pad in its housing Only for full-face helmets: Insert the chin strap into the polystyrene cheek pad loop.
The type of command given to the system depends on how long the pushbutton is pressed. System ON System OFF Increase Volume Decrease Volume 5.1. Press “on” and keep it pressed for about 2 seconds, until the LEDs turn on and you hear a beep in the headset. Press “on” and keep it pressed for about 5 seconds, until the LEDs turn off and you hear a beep in the headset. Briefly press “+” to increase the volume. A double tone signals the highest volume level. Briefly press “-” to decrease the volume.
Bx4 Manage connections with other bikes The programme includes an on-line guide that explains how it works (after installing it on your PC, press F1 to display this guide). 7. PAIRING UP BLUETOOTH DEVICES In order for the BX4 system to be connected to another Bluetooth device, the latter needs to be first paired up with the N-Com system. The pairing up procedure is the same for all Bluetooth devices: mobile phones, MP3 Bluetooth players, satellite navigators, etc. 1. Make sure the B4 is turned off; 2.
8.
Bx4 You can scroll through the band of frequencies using the automatic search function, preset up to 6 favourite radio stations and change stations among the pre-set ones. Turning on the radio Turning off the radio New station automatic search Pre-setting a radio station The radio turns on automatically by selecting the “Radio” menu (scroll through the menu by pressing “on” for 2 seconds).
13. RIDER-PASSENGER INTERCOM MODE In order to use BX4 in wireless intercom mode, both helmets have to be equipped with a Bluetooth kit. In order for two Bluetooth Kits to communicate with one another, they have to be paired up first. 13.1. Intercom affiliation 1. Make sure both N-Com Bluetooth systems are turned off; 2. Set both N-Com Bluetooth systems in Pairing up mode by pressing “on” (for more than 4 seconds), until the LEDS start to flash quickly; 3.
Bx4 B C D - 2 sec. + 4 sec. - 4 sec. 2 grave beeps 4 acute beeps 4 grave beeps N.B.: If the selected memory setting is taken, you will hear an error beep after which a different combination must be entered. 4. After a few seconds, the helmets “recognize” one another: a confirmation beep is given in Helmet 2 that indicates the memory setting where Helmet 1 is stored and Intercom communication is established; N.B.
ricerca della riconnessione automatica dura 2 minuti, al termine dei quali è necessario effettuare la riconnessione tramite la “Chiamata Moto-Moto”. Per maggiori informazioni si prega di visitare il sito www.n-com.it 15. BATTERY Before using the N-Com device for the first time, recharge the battery completely for at least 10 hours. To obtain best performances from the battery, it is recommended to completely recharge the battery the first few times.
16.
Button Bike to Bike Menu Radio menu Pressure on on + + - - + - + - Brief Long Brief Long Brief Long Brief Long Automatic search for new station Change station (pre-set stations) Pre-set station Answer call Bike-toBike Intercom swap (from Bike-to-Bike to Rider-Pillion Passenger)* Connection to Bike 1 Connection to Bike 2 Connection to Bike 3 Connection to Bike 4 Setting Pairing up mode system turned off Rider-Passenger intercom pair up Bike 1 pair up X (2s) X (2s) X (4s) X X X X X
Bx4 17. LIMITED WARRANTY With this LIMITED WARRANTY CERTIFICATE, Nolan® warrants this Product to be free from defects in material and workmanship at the time of its original purchase by the buyer. We invite you to: - Read the cautions pertaining to safety and proper use. - Read the warranty terms and conditions. - Keep the originals sales receipt. This must be shown in case of repairs covered by warranty. In these cases, the product has to be taken back to the dealer where it was purchased. 17.1.
Moreover, the defects covered by this warranty do not include all those specific and subjective situations that may come up during the active use of the helmet such as, for example, comfort problems while riding or aerodynamic noises.
Bx4 Some Countries do not allow the exclusion or limitation of incidental or consequential damages, or the limitation of the duration of implied warranties; as a result of this, the previous limitations and exclusions may not be applicable to you. This warranty does not have any effect on the customer’s legal rights under the national jurisdiction in force or on the consumer’s rights towards the dealer sanctioned by the purchase/sale contract.
18.
n-com BX4 - 01/08/2012 08:41:00 Printed on recycled paper