
User's Manual


15
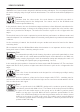
Push the settings button to access all settings. When settings
button is pressed, the volume setting, which is the first setting
on the settings bar located at the bottom of the screen, will be
highlighted in black. Each time you press the settings button,
the next setting on the bar will be selected and its value will be
displayed on screen. You can change the value using the plus
(+) and minus (-) buttons.
To exit the settings, press the Settings button one by one
until the main screen is displayed. While in the settings bar,
if no button is pressed for a while, settings will time out and
the device will revert back to the main screen.
NOTE: Notch discrimination is not active in the All Metal mode
and iron volume setting is not active in the All Metal and Beach
modes thus cannot be selected.
Volume
This control allows you to increase or decrease the device's volume based on your preference
and environmental conditions. Volume setting consists of 4 levels and is adjusted by using the plus
(+) and minus (-) buttons. When you turn off and on the device, it will start with the last volume level
you chose. This setting is common to all modes; changes will take effect in all modes.
Because the volume level affects power consumption, we recommend you not to increase it more than
necessary.
Ground Balance
SIMPLEX+ is designed to work without ground balancing in Field and Park modes on most
terrains. However, for experienced users and on highly mineralized grounds, ground balancing will
bring extra depth and stability to the device.
Ground balance can be performed in two ways with the SIMPLEX+: Automatic and Manual.
When ground balancing is selected in the settings menu, the device will switch to All Metal mode
automatically regardless of the selected search mode.
Automatic Ground Balance
Automatic ground balance is performed as follows in all search modes:
1. Find a spot where there is no metal.
2. After selecting the ground balance setting in the settings bar, press and hold down the
pinpoint/confirm button and start pumping the search coil up and down from about 15-20 cm (~6''-
8'') above the ground down to 3 cm (~1'') off the ground with smooth movements and keeping it
parallel to the ground.
3. Continue until a beep, indicating the completion of ground balance, is heard. Based on ground
conditions, it usually takes about 2-4 pumps for the ground balance to be completed.
4. Upon completion of the ground balance, ground balance value is shown on the display. The device
continues to ground balance and produce a beep sound as long as you keep pumping the coil. In order
to ensure that the ground balance is proper, ground balance at least 2-3 times and check the ground
balance values on the display. In general, the difference between the values shall not be higher than
1-2 numbers.
5. If you cannot ground balance, in other words, if no beep sound is produced, it means that either the
ground is too conductive or not mineralized or there is a target right below the search coil. In such a
case, retry ground balance at a different spot.
NOTE: If the ground mineralization is too low, automatic ground balance may fail to work in other
modes except for the Beach mode.
Manual Ground Balance
Allows you to manually modify the ground balance value. It is not preferred mostly because it takes
time. However, it is the preferred option in cases where automatic ground balance cannot be performed
or fine tuning is necessary for the automatic ground balance value.
SIMPLEX+ is designed to allow for automatic ground balancing conveniently on any type of ground.
However, the ground may not be suitable for automatic ground balancing in some cases and the
device cannot ground balance on such grounds. For instance, wet beach sand, soils containing alkali
or salty water, trashy sites, ploughed fields, highly mineralized grounds and grounds with very low
mineralization are not suitable for automatic ground balance. In such terrains, you can auto ground
balance in the Beach mode and then switch to other modes or try manual ground balancing. However,
manual ground balance requires a skill which develops over time through practice.
To perform manual ground balance:
1) Find a clear spot without metals and select ground balance from settings.
2) You need to listen to the sounds coming from the ground in order to perform manual ground balance.
Pump the search coil up and down from about 15-20 cm (~6''- 8'') above the ground down to 3 cm (~1'')
off the ground with smooth movements and keeping it parallel to the ground.
If the sound gets higher when lifting off the search coil above the ground, the ground balance value is
too low, in other words, the effect from the ground is negative and the ground balance value needs to
be increased by using the plus ( + ) button. On the other hand, if the sound gets higher when lowering
the search coil to the ground, the ground balance value is too high, in other words, the effect from the
ground is positive and the ground balance value needs to decreased by using the minus ( - ) button.
3)
The ground balance value will be shown on the display and remain there for a moment. You can return
to the ground balance screen by selecting ground balance from the settings menu again if the screen
switches.
Manual ground balance functions within the range of 0-99.8. Press plus (+) or minus (-) buttons to
increase or decrease the ground balance value, respectively. If the buttons are pressed once at a
time, the values count one by one and if they are held down, the values will change quickly.
4) Repeat the above procedure until the sound heard from the ground is eliminated.
The sound may not be eliminated completely in some areas. In these cases, listen to the sounds
produced when moving the search coil towards and away from the ground to check if the ground
balance is correct. If there is no difference between the two sounds then the ground balance is set
properly.
IMPORTANT! Experienced detectorists adjust the ground balance setting to a slightly positive response
(weak but audible sound is produced when moving the search coil closer to ground). This method may
produce favorable results for experienced users in certain fields where small targets are searched for.
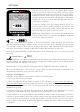
Ground Balance Value
Ground balance value provides information about the ground you are searching on. Some typical
ground types are as follows:
0-25 Wet salt water or wet alkali soils
25-50 Wet salt water and wet alkali soils covered with dry layers
50-70 Regular, low-quality soils
70-90 Highly magnetic soils, magnetite or maghemite and similar highly mineralized soils,
black sand
Iron Volume
It adjusts or turns off the volume of the low iron tone. It consists of 3 levels and can be adjusted
using the plus (+) and minus (-) buttons.
As you lower the iron volume, the audio response volume the device produces for ferrous metals will
decrease. When the iron audio is turned off, the device will detect ferrous targets, the Target ID will
be displayed on the screen but the device will not produce any warning tone.
Iron volume setting cannot be used in the All Metal and Beach modes and thus cannot be selected.
Iron volume adjustment applies to the selected search mode only. The change does not affect the
other modes.
Notch Discrimination
Use the notch discrimination setting to eliminate unwanted metals from detection such as
trash.
SIMPLEX+ has 20 pixels or "notches" of discrimination, shown under the TARGET ID scale with small
boxes. Each box represents a group of 5 IDs (01-05, 06-10, 11-15 and so on). Any combination of these
boxes can be rejected or accepted based upon your preference. The boxes rejected will be highlighted
in black.
Notch discrimination can be used in 2 different ways in the SIMPLEX+: Automatic or Manual.
Automatic:
1. Press the settings button and then select notch discrimination in the settings bar.
2. Swing the search coil over the metal you want to eliminate. The box that represents the group of
IDs for that metal will be highlighted in black.
3. Press the confirm button.
Manual:
1. Press the settings button and then select notch discrimination in the settings bar. An X and a check
mark will appear on screen along with a small arrow cursor underneath the ID bar at the top of the
screen.
2. Move the arrow cursor using the plus (+) and minus (-) buttons and select the box that includes the
ID you want to eliminate.
3. Press the confirm button. The box will be highlighted in black.
To give an example; let's say you want to reject a metal with 27 ID. Select the notch discrimination
setting in the settings bar. The cursor will appear under the first box. Using the plus (+) button and
by counting in multiples of 5, move the cursor to the 6th box which represents IDs between 26-30.
Push the confirm button once. The box as well as the X icon on screen will be highlighted in black.
After this, the device will not provide any audio response for metals with 26-30 ID.
The cursor will appear where you last left it the next time you use the notch discrimination setting.
In the notch discrimination setting, all the group of IDs you turned off will be shown with the X and
the ones that are not turned off will be shown with the check mark.
You can turn off multiple boxes automatically or manually.
To turn back on the IDs, either select the turned off box with the help of the plus (+) and minus (-)
buttons or swing the search coil over the metal you rejected before and press the confirm button.
Frequency Shift
It is used to eliminate the electromagnetic interference that the device receives from another
detector which operates in the same frequency range nearby or from the surroundings. If too
much noise is received when the search coil is lifted in the air, this may be caused by the local
electromagnetic signals or excessive gain settings.
To eliminate the noise caused by electromagnetic interference, try shifting the frequency first before
lowering the sensitivity to obtain maximum depth performance. Frequency shift consists 5 small steps
(F1-F2-F3-F4-F5). Default setting is F3 which is the central frequency. The selected frequency will be
highlighted in black.
To shift the frequency, after selecting the frequency shift in the settings menu, use the plus (+) and
the minus (-) buttons. Please wait for a few seconds after changing the frequency.
IMPORTANT! Frequency shift may impair performance. Therefore, it is suggested that you do not shift
the frequency unless it is necessary.
Wireless Connection
It is used to turn on and off the wireless headphones connection and to change the channel.
After choosing the wireless connection setting in the settings bar, you can change the channels
between 1-5 or you can completely turn the wireless connection off by choosing the 0 position.
For more detailed info about the wireless headphones, please read the instructions included with the
headphones.
Vibration
This feature provides feedback to the user by producing a vibration effect when a target is
detected. It can be used independently or together with the audio response. When audio response
is disabled, all responses during target detection are provided to the user as vibration only.
When the vibration is turned on, the device provides short vibration signals upon target detection. The
magnitude of the vibration effect can vary according to the depth of the target and the swinging speed.
This setting is common in all search modes.
To turn on or off the vibration, after selecting vibration in the settings menu, use the plus (+) and the
minus (-) buttons.
Vibration may not be felt in the All Metal mode with weak signals; it will be felt as the signal gets
stronger. In other words, vibration does not start at the depth where the audio tones are heard but
at a lesser depth. Therefore, if you are detecting with vibration only and audio tones are off, you can
miss weaker and deeper signals.
NOTE: The vibration setting always comes in off position when device is turned off and on again.
Brightness
It enables you to adjust the display and keypad backlight level according to your personal
preference. It consists of 5 levels and the 5th level is the auto level (A). At 0 level, when all the
boxes are empty, the backlight is off. When set to level A, it lights up only for a short period of time
when a target is detected or while navigating the menu and then it goes off. At 1-4 levels, it will be
continuously lit. The continuous operation of the backlight will affect power consumption, which is
not recommended.
The backlight setting is restored to the final saved setting when the device is turned off and on again.
This setting is common in all modes; change made in any mode also applies to the other modes.
LED Flashlight
It is the headlight used for lighting the area you are scanning while detecting at night or in dark
locations. To turn on or off the LED flashlight, after selecting it in the settings menu, use the plus (+)
and the minus (-) buttons. LED flashlight does not operate when the device is off. It is recommended
to turn it on only when necessary since its operation consumes extra battery power.
PINPOINT
Pinpoint is to find the center or the exact location of a detected target.
SIMPLEX+ is a motion detector. In other words, you are required to move the search coil over the target
or the target over the search coil in order for the device to detect the target. The pinpoint mode is a
non-motion mode. The device continues to give a signal when the search coil is kept stationary over
the target.
When the pinpoint button is pressed and held down, a graphics consisting of a dot surrounded by 4
circles will appear in the middle of the screen. As the target is approached, the circles will disappear
one by one and when the center of the target is reached, only the dot will be left on screen. In the
pinpoint mode, the signal tone increases in pitch and volume as the search coil approaches the target.
In this mode, the device does not discriminate or give target IDs.
To perform pinpoint:
1) After a target is detected, move the search coil aside
where there is no target response and push the pinpoint
button.
2) Keep the button pressed down and bring the search coil closer
to the target slowly and parallel to the ground.
3) Signal sound becomes stronger and changes in pitch
while getting closer to the target center and the circles start
disappearing in the pinpoint graphics.
4) Mark the position which provides the loudest sound using a tool
or your foot.
5) Repeat the above procedure by changing your direction 90°.
Actions to be performed from a couple of different directions will
narrow the target area and provide you with the most exact details
of the target location.
SETTINGS
A
10 30 50 70 90