
User's Manual


5
1
2
3
1
3
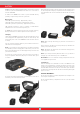
BACK
SCAN OK
CLR
d
a
b
c
e
4
5
6
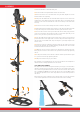
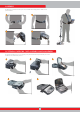
SHAFT AND HANDLE
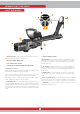
(1) ON/OFF BUTTON : It powers the shaft and handle on and off. It
works independently from the system box.
(2)
BATTERY COMPARTMENT COVER
(3) IPTU SENSOR INPUT SOCKET
(4)
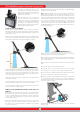
GROUND BALANCE/PINPOINT AND RETUNE TRIGGER
This trigger has 3 functions :
1) It is used for automatic ground balancing. When you push the trigger
forward, the ground balance screen is displayed.
2) In non-motion modes, it is used to retune the device. In order to do
this, you need to pull the trigger once towards you and release.
3) In motion modes, it is used for pinpointing. You need to pull the
trigger towards you and hold it for this function.
(5) LED FLASHLIGHT : It is the headlight used for lighting the area you
are scanning while detecting at night or in dark locations. To activate
the LED flashlight, double click the CLR button on the handle. It does
not operate when the shaft & handle is off. It is recommended to turn
it on only when necessary since its operation consumes extra battery
power.
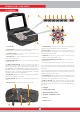
(6) SHAFT & HANDLE KEYPAD
a) BACK BUTTON : It has the same function as the BACK button on the
system box. It allows you to exit the current screen or to go back to
the previous one. In addition, it is used to remove the pop-up message
windows from screen.
b) CLR BUTTON : In detection and scan screens, press and hold this
button to clean the screen and to center the search coil (bring it to
the origin) on the screen. It also turns on the LED flashlight when you
double click it.
c) SCAN BUTTON : It is used to switch to the scan screen and to scan
over detected targets. Please read the section ''scanning'' for more
details.
d) Wireless LED INDICATOR :
Indicates the wireless connection between
the system box and the shaft & handle. If the LED is lit red, it means
there is no connection. If it is lit green, it means they are connected.
e) OK BUTTON : It is used to confirm an action or to go to the result
screen after performing a scan.
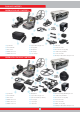
INTRODUCTION TO THE DEVICE