
User's Manual


4
INTRODUCTION TO THE DEVICE
1
4
ON / OFFOPTIONS
SCREEN
CAPTURE
PAN
ROTATE
TRACE
SETTINGS
INFO
a
b
c
d
e
f
g
BACK
OK
a c
b
c
d
e
c
c
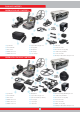
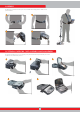
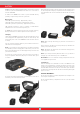
(1) LCD SCREEN
(2) UPPER KEYPAD - The functions of the buttons on this keypad are
explained further in the relevant sections of the manual.
a) SETTINGS BUTTON : It is used to access the settings in the
Detection, Scan and Result Screens.
b) TRACE BUTTON : It is used to follow the search coil in the detection
screen with the IPTU sensor.
c) PAN/ROTATE BUTTON : It allows you to rotate and slide the 3D graph
in the result screen.
d) SCREEN CAPTURE BUTTON : It takes a snapshot of the screen. It
can be used in all menus and screens. Once you press this button, it
takes the screen image, assigns a record number to it and then saves it
in SCREENSHOTS under ARCHIVES by recording its date and time as
well. When this button is pressed, a window with the following message
will appear on screen : ''Screenshot is successfully saved as...''. To remove
this window, press the OK or the BACK button.
e) INFO BUTTON : This button is used to open and close the information
bar located at the bottom of the screen.
f) OPTIONS BUTTON : Allows you to access the general settings of the
device.
g) ON/OFF BUTTON : It powers the system box on and off.
(3) LOWER KEYPAD - The functions of the buttons on this keypad are
explained further in the relevant sections of the manual.
a) BACK BUTTON : It allows you to exit the current screen or to go
back to the previous one. In addition, it is used to remove the pop-up
message windows from screen.
b) OK BUTTON : This button is used to confirm an action or to go to
the result screen after performing a scan.
c) DIRECTION/VOLUME/ZOOM BUTTONS : This set of keys has 3
different functions :
1- To navigate between the menu options and to adjust the settings.
2- To increase and decrease the volume with the plus (+) and minus (-)
buttons in the detection screens as well as when the tutorial videos are
being played.
3- The up and down zoom buttons are used to magnify or reduce the
target signal graphs in detection screens. They are also used to fast
forward or rewind the tutorial videos.
d) ZOOM IN BUTTON : Brings the detection and scan grounds closer
on the screen. When fully zoomed in, the scale is 50cm.(20''). It is also
used to zoom in to the 3D graph on the result screen.
e) ZOOM OUT BUTTON : Takes the detection and scan grounds further
away on the screen. When fully zoomed out, the scale is 800 cm. x 800
cm (≈ 26ft. x 26ft.). It is also used to zoom out from the 3D graph on the
result screen.
(4) SPEAKER
(5) SCREEN FIXING SCREW
(6) WIRED HEADPHONES SOCKET
(7) EXTERNAL USB MEMORY SOCKET
(8) BATTERY
(9) BATTERY LOCK
6
5 9
7
8
SYSTEM BOX
2
3