
User's Manual


27
painting will be in red or blue for a short period of time independent
from the target. Then the painting will be done according to the metal
type just like in the search screen.
TIP : Once the scanning is completed, if you swing the search coil over
the edges of the scanned area with short sweeps and clean out the
spots with no target signals, the device will obtain a much better raw
data.
e. Once the scanning is completed, release the scan button.
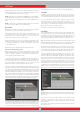
If you want, you can scan multiple targets at the same time by holding
the SCAN button pressed or scan them one by one by pressing and
releasing the SCAN button each time. In each case, the 3D graphs and
shapes of all targets will appear in a single result screen.
NOTE : Targets with a signal strength of more than 40 on the
Drift-Metal bar located on the bottom of the screen (not present in
the Ground Anomaly & Cavity) will yield better shapes. For weak
signals with a signal strength of less than 40, you can increase the
sensitivity to boost the signal strength.
NOTE : In the scan screen, if you scan over the targets without pressing
the SCAN button, the device will produce an audio response but will not
paint on screen. If you press the OK button in such a case, the device
will go to the result screen but the screen will be blank.
The timing for refreshing the scan screen (data to be erased from
screen) is around 8 minutes for non-motion and motion modes and
around 16 minutes for the Ground Anomaly & Cavity mode. In the
scan screen, different than the detection screens, the visible parts of
the screen will be cleared.
IMPORTANT! If strong drifts occur once you go to the scan screen,
first pull the trigger toward you once and release to manually retune
the device. If the drifts are still present, press the BACK button to go
to the detection screen. Then press the SETTINGS button, select the
AutoReset option and adjust it to a level to eliminate the drifts. In case
the drifts are still present, go to the scan screen, press the SETTINGS
button and lower the sensitivity level.
IMPORTANT! IIf overload occurs in the scan screen, you need to press
the SETTINGS button and lower the sensitivity.
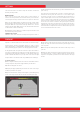
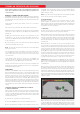
To measure the field by scan process :
You can use the scan process just to measure the field you are in. In
order to do this, press and hold the SCAN button, start walking in a
straight direction and scan without swinging the coil. You can apply
this process in all fields with different shapes, circular or square. Once
the scanning is completed, release the SCAN button and press OK. An
empty result screen will appear on screen. Press the OK button again
and the scanned area will be shown linearly. By using the scale on the
screen, you can see the dimensions of the scanned area with 94% -
97% accuracy.
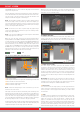
The sample image below belongs to a result screen of a 200x250cm.
(6.7'x8.3') scanned area.
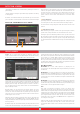
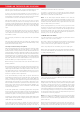
SEARCHING IN DETECTION SCREEN WITHOUT IPTU SENSOR
While searching in the detection screen without the IPTU sensor,
all target signals including false signals are shown on a running
oscilloscope window with 2D graphs. Based on metal type, the target
signal is shown in the same color as the ID bar at the top. The IDs
filtered out by the Discrimination setting are indicated by gray color
but the device does not provide an audio response for these targets.
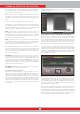
Upon target detection, the 2D graph of the target signal will peak
according to the signal strength. You can magnify or reduce the signal
graph with the zoom function. Upon target detection, the Drift-Metal
bar will fill up in the METAL direction and the ID of the target is shown
both in the target ID window at the bottom and with a cursor on the
color target ID bar at the top.
While searching in this screen, drifts may happen in both directions on
the Drift-Metal bar. When the bar fills up in the DRIFT direction, nothing
will be displayed on the oscilloscope and the device will not produce
any audio. When the drift happens in the METAL direction on the other
hand, a flat, continuous graph will appear on the oscilloscope, and the
device will produce an audio response.
In such a case, first pull the trigger towards you once and release it to
manually retune the device. If the drifts are still present, you can use
the Stabilizer setting to eliminate the drifts. However, please remember
that as the Stabilizer setting is increased, the device may detect weaker
signals but will not be able to detect the targets anymore if you hold
the coil stationary or sweep back and forth over the target.
TURNING ON THE DEVICE AND SEARCHING