
User's Manual


26
direction on the other hand, a flat, continuous graph will appear on the
detection ground, and the device will produce an audio response.
In such a case, pull the trigger towards you once and release it to
manually retune the device. If the drifts are still present, you can use
the AutoReset and Stabilizer settings to eliminate the drifts. Please
read the relevant sections of the manual for more details.
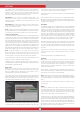
The 3D signal graph will stay on screen as long as you do not move
the search coil. Once you move the coil, it will stay on screen for about
3 minutes and then disappear. As the 3D detection ground slides, the
signals may fall outside the screen. If you go back to the spots where
you obtained the signals within 3 minutes, you can see the 3D graphs
again.
In detection screen with the IPTU sensor, you can use the CLR button
to clean the screen. Each time you press the CLR button, all data on
screen will be erased and the search coil will go to the origin and will
be centered on screen.
You can magnify and reduce the target signals with the up and down
buttons.
The usage details mentioned above are common for all modes except
for the Ground Anomaly & Cavity mode. For Ground Anomaly & Cavity
mode, please read the next section.
Searching in Ground Anomaly & Cavity Mode
The most important thing you need to know before using this mode
is that this mode, different than the other modes, is not a ''detection''
mode but rather a ''survey'' mode. In this mode, the device will detect all
ground anomalies and cavities. Anomalies include, but are not limited to
the below: Different soil types within the same area, mineralized rocks,
disturbed ground etc. etc. Similarly the cavities can be listed as: Rooms,
tunnels, caves, cellars and graves underground. It is recommended that
this mode should not be used in random fields but only in places with
limited size where you suspect the presence of a cavity.
Before starting to use this mode, first be sure that the IPTU sensor is
properly calibrated.
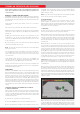
Retune height will be shown on the height indicator. By lifting the coil
up to the retune height, pull the trigger back once and release. The
sweep height will be marked on the height indicator. Lower the coil to
the sweep height and start searching. While searching, the coil must
stay within the green area on the indicator. This is very important for
the device to perform correct computations.
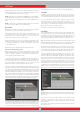
In the Ground Anomaly & Cavity mode, all signals obtained from
ground with the movement of the coil (ground effect, ground anomaly,
cavity or metal), are indicated by painting on the screen. When you
first start searching, the 3D graph of the signal obtained from ground
appears bigger and stronger for a short period of time. Then it goes
back to normal. For the device to perform accurate computation in this
mode, it has to collect data for a certain period of time. Therefore, it is
recommended that you scan an area of minimum 5-10m² (54-108ft²)
around the suspected area.
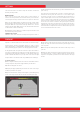
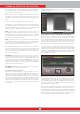
In this mode, ground effect is indicated by yellow, metals and positive
hot rocks by red, and ground anomaly and cavity are indicated by gray
or blue color, based on the strength of the signal. In high mineralization,
the device may paint in red color just like in positive hot rocks.
In addition, the signals of targets painted in red are shown with a peak
facing upwards and the signals of targets painted in gray and blue are
shown with a pit facing downwards.
In this mode, the device does not provide any audio response. All
targets and signals are only shown visually on screen. For this reason,
you must follow the screen carefully while searching in this more. If
needed, you can zoom in and out on the screen.
If a metal or a positive hot rock is detected, the target ID will be
displayed on the ID bar at the top. The target ID bar in this mode is
white and not colored like the other modes.
NOTE : In this mode, targets with IDs between 0-10 or above 97
indicate positive hot rocks. Sometimes mineralized and volcanic rocks
may generate such IDs and the presence of ground anomalies is very
common around them. Therefore, cavity signals obtained in such areas
may not always belong to real cavities.
The 3D signal graph will stay on screen as long as you do not move
the search coil just like in the other modes. Once you move the coil,
it will stay on screen for about 6 minutes and then disappear. As the
3D detection ground slides, the signals may fall outside the screen.
If you go back to the spots where you obtained the signals within 6
minutes, you can see the 3D graphs again.
SCANNING WITH IPTU SENSOR
Scan function works in non-motion modes only. The device will not
switch to scan screen in motion modes!
To be able to obtain the 3D graphs and the shapes of the detected
targets in the search screen with the IPTU sensor, you must perform
a scan. In order to do this, please follow the steps below :
a. First, step away from the area where you get the target signal.
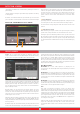
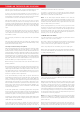
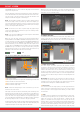
b. Then, press the scan button once and release. The device will switch
to the scan screen. Different than the detection screen, the scan screen
is a white, chequered ground.
c. Press and hold the clear button. When you see the coil centered on
the screen, release the button.
d. By pressing and holding the scan button, swing the coil left to right
slowly and scan over the target, starting from a bit away from where
the signal is starting and until the coil is completely off the target
signal. The most important things you should pay attention to while
scanning are holding the search coil stable and parallel to the ground,
and slightly overlapping each sweep with no gaps in between. You
can see the gaps clearly on screen. If you are in the Ground Anomaly
& Cavity mode, keeping the search coil height within the green area
on the indicator is also very important.
NOTE : Do not let go of the SCAN button as long as you hear the target
signal. If the SCAN button is released and pressed again, the shapes
will not be correct and there will be gaps between the start and finish
points of the scan.
Except for the Ground Anomaly & Cavity mode, the areas where the
device receives a signal will be painted in red. In the Ground Anomaly
& Cavity mode, on the other hand, when you first start scanning, the
TURNING ON THE DEVICE AND SEARCHING