
User's Manual
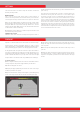


5) The loudest sound indicates the center of the target. As the coil is
exiting the target, the sound starts decreasing and the gray coloring
turns to yellow.
6) Mark the position which provides the loudest sound using a tool or
your foot.
7) Repeat the above procedure by changing your direction 90°. Actions
to be performed from a couple of different directions will narrow the
target area and provide you with the most exact details of the target
location.
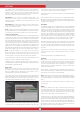
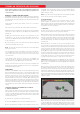
Pinpoint is to find the center or the exact location of a detected target.
Ground balance should be performed properly in order to ensure
precise pinpointing. It is recommended to perform ground balance again
before performing pinpoint operation on changing ground structures.
In the pinpoint mode, the signal tone increases in pitch and volume as
the search coil approaches the target. In this mode, the device does not
discriminate or give target IDs. If the device is in the vibration mode, the
speed of vibration will increase as you get closer to the center of target.
Pinpoint works in the motion modes only (All Metal, Fast and Deep).
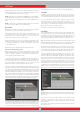
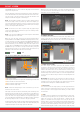
To perform pinpoint :
1) After a target is detected, move the search coil aside where there is
no target response and pull the trigger towards you and hold it.
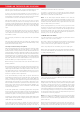
2) A red bar will appear on screen.
3) Keeping the trigger pulled, bring the search coil closer to the target
slowly and parallel to the ground.
4) Signal sound becomes stronger and changes in pitch while getting
closer to the target center and also the bar start filling up in gray.
Save function works in all modes except for the Basic and Ground
Anomaly & Cavity modes.
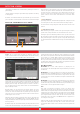
Mode Defaults
This is used to set the mode settings back to factory defaults. It
restores the factory defaults for the mode currently in use and does
not change the settings of other modes or the options of the device.
When you select Mode Defaults, the warning message ''Current mode
will be restored to factory defaults. Are you sure you want to continue?''
will appear. When OK is pressed the message ''Please wait…'' and the
progress bar will appear. When the bar is full, the device will revert back
to the detection screen automatically.
Mode Defaults function works in all modes except for the Basic and
Ground Anomaly & Cavity modes.
Calibrate the sensor
The IPTU sensor must calculate its height and angle to be able to
21
PINPOINT
provide accurate data. For this reason, you must calibrate the sensor
upon start up.
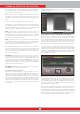
First, adjust the shaft length and coil angle to searching position. To
calibrate the sensor, place the search coil on a flat surface, adjust
the search coil angle so that it is parallel with the ground and lean it
against a fixed object such as a tree, rock or a wall. If there is no place
to lean it against, hold it stable with your hand. Press the SETTINGS
button and select ''Calibrate the sensor''. The message ''Please place
the coil on a flat surface as shown in the figure and press ok will be
displayed on screen. Press the OK button. You will see the message ''
Calibrating the sensor, please wait.'' Once the progress bar is full, the
calibration will be completed and the device will automatically revert
to the selected mode's detection screen.
SETTINGS