
User's Manual


20
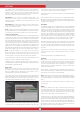
HEDEF ID
At the maximum level of iMask false signals will disappear or will be
minimized. However, in some cases, increasing the iMask will result in
loss of depth for certain metals such as copper.
NOTE : When detecting in 5kHz with the INVENIO Pro on wet or highly
mineralized ground, in order not to miss smaller high conductive metals
(silver, copper etc.) it is recommended not to increase the iMask level too
high.
NOTE : If the ground is not highly mineralized or does not contain many
hot rocks, setting the iMask to ''0'' is recommended.
Notch Filter
Notch Filter is the ability of the device to discriminate single or multiple
Target IDs by not emitting an audio response for them.
Although Notch Filter may seem similar to Discrimination at first
glance, these two settings have different functions. While the
Discrimination filters out all IDs between 0 and the set value, the
Notch Filter discriminates IDs out individually.
With the Notch Filter, you can reject a single ID or multiple IDs at the
same time. This process does not affect any IDs below or above the
selected IDs. For example, you can filter out IDs between 31-35 as well
as 50 simultaneously.
Notch Filter setting is available in Fast and Deep modes only.
How To Use The Notch Filter Setting
Notch Filter cannot be used within the Discrimination range. In other
words, if the Discrimination is set to 15, Notch Filter can only be applied
to IDs 16 or higher. If you want to notch out IDs 15 or below, first you
need to change the Discrimination value.
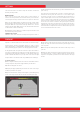
To use the Notch Filter, press the SETTINGS button and using the up
and down buttons, select it from the options. On the colored ID bar on
screen, the first ID that you can filter out will be displayed inside the
cursor. For example, if the Discrimination is set to 15, when you select
Notch Filter, number 16 will be displayed inside the cursor.
Let's say you want to reject IDs between 20-25 and 40. Using the plus
(+) and minus (-) buttons, select number 20 and press OK. The cursor will
turn orange and number 20 will be marked with a black line on the ID
bar. Then, using the plus (+) button, go to number 25 and press OK. Now,
the 20-25 interval will be marked in black on the ID bar. At the same
time, the first number of the notched out range (20) will be displayed
under the bar and the last number of the range (25) will be displayed
above the ID bar. Now, using the plus (+) button again, go to number 40
and press OK. Similarly, number 40 will be marked with a black line.
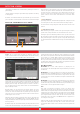
To accept back the filtered IDs, select Notch Filter from SETTINGS. The
cursor will be appear where you last left it and it will be white. Using
the plus (+) or the minus (-) button, move the cursor onto the ID you
want to accept and press OK. Along with the cursor, the black line will
turn orange and the notched out number on screen will disappear.
Iron Audio
It adjusts or turns off the volume of the low iron tone. It consists of 5
levels adjustable with the plus (+) and minus (-) buttons. Factory default
is the maximum level. The adjusted level is indicated with orange color.
5 is the maximum level. As you lower it, the audio response volume
the device produces for ferrous metals will decrease. When it is off,
the iron audio will be silenced. In other words, the device will detect
ferrous targets, the Target ID will be displayed on the screen but the
device will not produce any audio response.
Iron Audio is active in Fast and Deep modes only.
Tone Break
In Fast and Deep modes, this setting is used to adjust the break points
of the target response tones on the Target ID range. Tone Break points
are different in these 2 modes. By using the Tone Break feature, for
each metal group (Ferrous, Gold/Non-Ferrous, Non-Ferrous) you can
change the point where the low tone changes into the higher tone.
When the Tone Break setting is selected, the tone break points of the
metal groups will be shown inside the cursor on the colored ID bar. There
are 2 tone break points in the Fast mode and 1 in the Deep mode.
To change the tone break points, go to the break point you want to
change by using the right and left buttons and press OK. Then, adjust
it using the plus (+) and minus (-) buttons. While adjusting, the number
in the cursor will change and the cursor will move on the ID bar.
To give an example for the above explanation; let's say you are in
the Fast mode and you want to change the Tone Break points. First,
select Tone Break from SETTINGS. The ID bar and the tone break
points of the metal groups will be displayed on the screen. Using the
directional buttons, let's say you increased the ferrous metal tone
break point from 40 to 45. Then, you decreased the tone break point
of the gold/non-ferrous metal group from 66 to 55. In this case, the
device will produce a low iron tone for all metals with IDs less than 45,
a medium tone for metals with IDs 45-55 and a high tone for metals
with IDs equal to and greater than 55 (If you have also adjusted the
Audio Tones, the selected frequency will apply to the new ID ranges).
Save
INVENIO allows you to save your settings during searching. Once you
saved your settings, the device will start with the saved settings upon
next start up.
Save function saves the changes made in other modes as well,
regardless of the mode you are in when you perform the save
function. The device starts in the last mode where the save function
was performed.
Save function saves all settings except for the ground balance, tracking
and frequency shift.
SETTINGS