
User's Manual

Access P oint Hardw are Installation Base Control Unit Installation
Procedure 4 -5 Installing the Plinth on a R aised Platform or R oof T op (Continued)
4
Set aside the plinth, and drill holes where hole locations are marked.
5
Set plinth over holes.
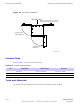
Secure plinth to platform or roof top using one large flat
washer , lock washer , small flat washer , 12M nut, and 12M
bolt each. T orque bolts to 65 ft-lbs (88 N-m) See Figure 4-9 .
If left and right brackets have not been attached to B CU , proceed
to step 6 . Otherwise, proceed to step 7
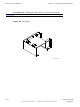
6
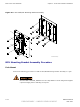
A ttach left and right brackets to underside of B CU using four screws, nuts,
and washers each. T orque screws to 10 ft-lbs (13.6 N-m ). See Figure 4-8 .
Proceed to step 8
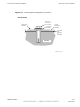
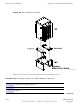
7
If B CU already has left and right brackets attached to its underside, set the
B CU onto the plinth and secure in place using eight screws. T orque the
screws to 10 ft-lbs (13.6 N-m).
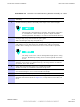
The B CU can only be set on the plinth in one direction. The
Customer Interface Compartment seats over the notched end of
the plinth.
68P09277A59 -8 4 -19
PRELIMINARY - UNDER DEVELOPMENT MA Y 2007