
User's Manual
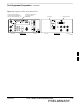

Test Equipment Preparation – continued
08/01/2001
F-11
1X SCt4812ET Lite BTS Optimization/ATP
PRELIMINARY
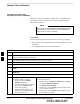
Table F-9: Power Meter Calibration Procedure
Step Action
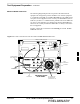
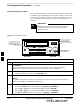
4 Perform the following to set or verify the correct power sensor model:
– Press
[SHIFT] then [a] to select SENSOR.
– Identify the power sensor model number from the sensor label. Use the [y] or [b] button to
select the appropriate model; then press
[ENTER].
NOTE
Be sure the PWR REF (power reference) output is OFF (observe that the triangular indicator is NOT
displayed as shown in Step 7). If on, press
[SHIFT] then ['] to turn it off.
5 Press [ZERO]. Display will show “Zeroing ******.” Wait for process to complete.
6 Connect the power sensor to the POWER REF output.
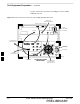
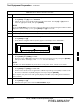
7 To turn on the PWR REF, perform the following:
– Press
[SHIFT] then ['].
– Verify that the triangular indicator (below) appears in the display above “PWR REF”.
8 Perform the following to set the REF CF %:
– Press (
[SHIFT] then [ZERO]) for CAL.
– Enter the sensor’s REF CF % from the sensor’s decal using the arrow keys and press [ENTER].
(The power meter will display ”CAL *****” for a few seconds.)
NOTE
If the REF CAL FACTOR (REF CF) is not shown on the power sensor, assume it to be 100%.
9 Perform the following to set the CAL FAC %:
– Press
[SHIFT] then [FREQ] for CAL FAC.
– On the sensor's decal, locate an approximate calibration percentage factor (CF%) at 2 GHz. Enter
the sensor’s calibration % (CF%) using the arrow keys and press
[ENTER].
When complete, the power meter will typically display 0.05 dBm. (Any reading between 0.00 and
0.10 is normal.)
10 To turn off the PWR REF, perform the following:
– Press
[SHIFT] then ['].
– Disconnect the power sensor from the POWER REF output.
F