
Service Manual


GSM-204-523
Krone block replacement
31st Oct 01
Maintenance Information: Horizon
macro
outdoor
68P02902W04-A
CONTROLLED INTRODUCTION
Maint. 3–39
Replacing a
Krone block
Removing a Krone block
To remove a Krone block:
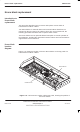
1. Locate the Krone block to be replaced on the top panel and unscrew the
two 4 mm captive screws at diagonal corners of the block. Remove the
cover.
2. Note the location of the wires into the terminal blocks and cut them using
insulated wire cutters.
3. Undo the two screws securing the 37-pin D-type connector and remove
the cable along with all other wiring from the block.
CAUTION
Take care in the following steps when removing the Krone
block not to drop the nuts or plain washers down the
interior of the cabinet.
4. Using a T20 Torx driver, unscrew and remove the four M3 x 8 screws
securing the block to the bulkhead.
The procedure for removing the Krone block is now complete.
Installing a replacement Krone block
To install a replacement Krone block:
1. Repeat the removal procedures in reverse order.
NOTE
When refitting the nuts and washers, tighten to a torque of
1.0 Nm using a 5.5 mm torque wrench.
Re-insert the disconnected wires to the positions noted in
the removal procedure using an insertion tool.
2. Check the Krone block connections.
3. Notify the OMC-R of the base station availability and log the maintenance
activity.
The procedure for installing a new Krone block is now complete.