
Service Manual


GSM-204-523
Replacing a Tx block
31st Oct 01
Maintenance Information: Horizon
macro
outdoor
68P02902W04-A
CONTROLLED INTRODUCTION
Maint. 3–37
Fitting a replacement Tx block
To install a replacement Tx block:
1. Transfer the protective caps on the RF connectors from the replacement
module to the faulty Tx block.
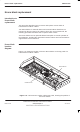
2. Carefully insert the replacement Tx block into its basket location on the top
panel, adjusting alignment for retaining screws. Take care to avoid
trapping cables as the Tx block is seated.
3. Fit the two M6 torx screws to hold the Tx block to the top of the cabinet.
Tighten to the correct torque (see Overview of FRU replacement
procedures in this chapter).
4. Reconnect the coaxial RF cables to the positions noted in the removal
procedure. Tighten to correct torque (see Overview of FRU replacement
procedures in this chapter).
NOTE
Ensure all unused SMA inputs to DCF, DDF and HCU
modules are fitted with 50 ohm load terminations.
5. Reset the appropriate CTU circuit breaker buttons on the CBM. Each
RADIO STATUS LED will flash green for about two minutes, and then
remain lit.
6. Enable the CTU transmit RF power by using the ins_device command
at the OMC-R, or from a PC connected to the MCUF. The Tx STATUS
LED (yellow) will be lit if the CTU is transmitting.
7. Notify the OMC-R of base station availability and log the maintenance
activity.
Tx block
blanking plate,
feedthrough
plate or HCU
replacement
The procedure for plates is the same as for Tx blocks, but the plates are held by
six M4 screws in the base of the Tx block basket. The two M6 Tx block screw
locations are not used for plate attachment.
CAUTION
Unused Tx block locations must be covered with a
blanking plate, with all screws fitted and tightened to the
correct torque (see Overview of FRU replacement
procedures in this chapter) to ensure correct airflow and
EMC shielding.