
Service Manual


GSM-204-523
Replacing a circuit breaker module (CBM)
31st Oct 01
Maintenance Information: Horizon
macro
outdoor
68P02902W04-A
CONTROLLED INTRODUCTION
Maint. 3–23
Replacing a
CBM
To replace a CBM:
1. Set the main circuitbreaker in the number 1 ac distribution box to OFF.
2. Set the three PSUcircuit breakers in the number 2 ac distribution box to
OFF.
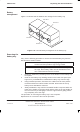
3. Set the switch of each PSM to the OUTPUT DISABLE position.
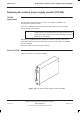
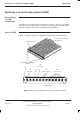
4. Unscrew both CBM module attachment screws (shown in Figure 3-10) by
using an M4 Torx driver.
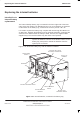
5. Pull the module out, using the handle-baffle.
6. Check that all push on/push off circuit breaker buttons of the new CBM
module are in the out (off) position.
7. Install the new module and press firmly into place.
8. Tighten both module attachment screws to correct torque (see Overview
of FRU replacement procedures in ths Chapter), using an M4 Torx
driver.
To restore power to the cabinet:
1. Set the main circuitbreaker in the number 1 ac distribution box to ON.
2. Set the three PSUcircuit breakers in the number 2 ac distribution box to
ON.
3. Turn each PSM switch to the OUTPUT ENABLE position. Check that each
PSM has the ACTIVE (green) light on and the ALARM (red) light off.
4. Press the CBM circuit breaker button marked BPSM A and (if redundant
BPSM fitted) BPSM B. Check all associated digital module indicators
operate correctly.
5. Press the CBM circuit breaker button marked SURF.
6. Press the CBM appropriate circuit breaker buttons for the CTUs fitted, and
check that the LEDs for each CTU indicate correct operation.
7. Close the door to ensure correct ventilation.
This completes the CBM replacement and power up sequence for a cabinet.