
User's Manual

Verifying and Setting GPIB Address
68P09258A31–A
Oct 2003
1X SCt 4812T BTS Optimization/ATP
F-14
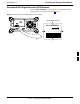
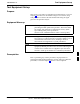
HP 437 Power Meter GPIB Address
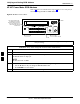
Refer to Figure F-10 and follow the steps in Table F-11 to verify and, if
necessary, change the HP 437 GPIB address.
Figure F-10: HP 437 Power Meter
ENTER
PRESET
SHIFT (BLUE) PUSHBUTTON –
ACCESSES FUNCTION AND
DATA ENTRY KEYS IDENTIFIED
WITH LIGHT BLUE TEXT ON
THE FRONT PANEL ABOVE
THE BUTTONS
FW00308REF
NOTE
This procedure assumes that the test equipment is set up and
ready for testing.
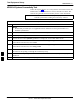
Table F-11: Verify and/or Change HP 437 Power Meter GPIB Address
Step Action
1 Press Shift and PRESET.
2 Use the y arrow key to navigate to HP–IB ADRS and press ENTER.
The HP–IB address is displayed.
NOTE
HP–IB is the same as GPIB.
3 If the current GPIB address is not set to 13, perform the following to change it:
– Use the y b arrow keys to change the HP–IB ADRS to 13.
– Press ENTER to set the address.
4 Press Shift and ENTER to return to a standard configuration.
F