
User's Manual

Verifying and Setting GPIB Address
68P09258A31–A
Oct 2003
1X SCt 4812T BTS Optimization/ATP
F-6
Verifying and Setting GPIB Address
Agilent E4406A Transmitter Tester GPIB Address
Refer to Figure F-3 and follow the procedure in Table F-4 to verify and,
if necessary, change the Agilent E4406A GPIB address.
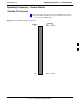
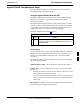
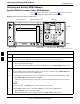
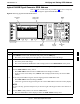
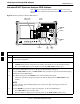
Figure F-3: Setting Agilent E4406A GPIB Address
System Key
Bk Sp Key
Enter Key
Data Entry KeypadSoftkey Buttons
Softkey Label Display AreaActive Function Area
ti-CDMA-WP-00085-v01-ildoc-ftw
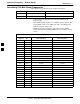
Table F-4: Verify and Change Agilent E4406A GPIB Address
Step Action
1 In the SYSTEM section of the instrument front panel, press the System key.
– The softkey labels displayed on the right side of the instrument screen will change.
2 Press the Config I/O softkey button to the right of the instrument screen.
– The softkey labels will change.
– The current instrument GPIB address will be displayed below the GPIB Address softkey label.
3 If the current GPIB address is not set to 18, perform the following to change it:
3a Press the GPIB Address softkey button. In the on–screen Active Function Area, GPIB Address will
be displayed followed by the current GPIB address.
3b
On front panel Data Entry keypad, enter the communications system analyzer GPIB address of 18.
– The GPIB Address label will change to Enter.
– Characters typed with the keypad will replace the current GPIB address in the Active Function
Area.
NOTE
To correct an entry, press Bk Sp key to delete one character at a time.
3c Press the Enter softkey button or the keypad Enter key to set the new GPIB address.
– The Config I/O softkey labels will reappear.
– The new GPIB address will be displayed under the GPIB Address softkey label.
F