
User's Manual
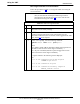
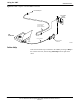
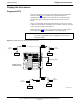
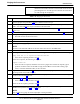
Table Of Contents
- Contents
- Chapter 1 Introduction
- Chapter 2 Preliminary Operations
- Chapter 3 Optimization/Calibration
- Introduction to Optimization and Calibration
- Preparing the LMF
- Overview of Packet BTS files
- LMF Features and Installation Requirements
- LMF File Structure Overview
- LMF Home Directory
- NECF Filename Conventions and Directory Location
- LMF Installation and Update Procedures
- Copy BTS and CBSC CDF (or NECF) Files to the LMF Computer
- Creating a Named HyperTerminal Connection for MMI Communication
- Span Lines - Interface and Isolation
- LMF to BTS Connection
- Using the LMF
- Pinging the Processors
- Download the BTS
- CSM System Time - GPS & LFR/HSO Verification
- Test Equipment Set-up
- Test Set Calibration
- Background
- Calibration Procedures Included
- GPIB Addresses
- Selecting Test Equipment
- Manually Selecting Test Equipment in a Serial Connection Tab
- Automatically Selecting Test Equipment in the Serial Connection Tab
- Calibrating Test Equipment
- Calibrating Cables Overview
- Calibrating Test Cabling using Communications System Analyzer
- Calibrate Test Cabling Using Signal Generator & Spectrum Analyzer
- Setting Cable Loss Values
- Setting TX Coupler Loss Value
- Bay Level Offset Calibration
- Purpose of Bay Level Offset Calibration
- What is BLO Calibration?
- Component Verification During Calibration
- When to Calibrate BLOs
- BLO Calibration Data File
- Test Equipment Setup for RF Path Calibration
- Transmit (TX) Path Calibration Description
- TX Calibration and the LMF
- TX Calibration
- All Cal/Audit and TX Calibration Procedure
- Download BLO Procedure
- Calibration Audit Introduction
- TX Path Audit
- TX Audit Test
- Create CAL File
- RFDS Set-up and Calibration
- Alarms Testing
- Chapter 4 Automated Acceptance Test Procedures

Using the LMF
68P64115A18–1
Mar 2003
1X SC 4812T Lite BTS Optimization/ATP Software Release R2.16.1.x
DRAFT
3-26
Logging Into a BTS
Logging into a BTS establishes a communication link between the BTS
and the LMF. An LMF session can be logged into only one BTS at a
time.
Prerequisites
Before attempting to log into a BTS, ensure the following have been
completed:
S The LMF is correctly installed on the LMF computer.
S A bts-nnn folder with the correct CDF/NECF and CBSC files exists.
S The LMF computer was connected to the BTS before starting the
Windows operating system and the LMF software. If necessary, restart
the computer after connecting it to the BTS in accordance with
Table 3-5 and Figure 3-3.
CAUTION
Be sure that the correct bts–#.cdf/necf and cbsc–#.cdf file are
used for the BTS. These should be the CDF/NECF files that are
provided for the BTS by the CBSC. Failure to use the correct
CDF/NECF files can result in invalid optimization. Failure to
use the correct CDF/NECF files to log into a live
(traffic–carrying) site can shut down the site.
BTS Login from the GUI Environment
Follow the procedures in Table 3-6 to log into a BTS when using the
GUI environment.
Table 3-6: BTS GUI Login Procedure
n Step Action
1 Start the LMF GUI environment by double–clicking on the WinLMF desktop icon (if the LMF is
not running).
– An LMF window will open and display the LMF build number in the title bar.
NOTE
If a warning similar to the following is displayed, select No, shut down other LMF sessions which
may be running, and start the LMF GUI environment again:
The CLI handler is already running.
This may cause conflicts with the LMF.
Are you sure you want to start the application?
Yes No
2 Click on Login tab (if not displayed).
3 Double click on CDMA (in the Available Base Stations pick list).
4 Click on the desired BTS number.
5 Click on the Network Login tab (if not already in the forefront).
6 Enter correct IP address (normally 128.0.0.2) for a field BTS, if not correctly displayed in the IP
Address box.
. . . continued on next page