
User's Manual


Verifying and Setting GPIB Addresses68P64115A18–1
Mar 2003
1X SC 4812T Lite BTS Optimization/ATP Software Release R2.16.1.x
DRAFT
F-7
Agilent 8935 Series E6380 (formerly HP 8935) Test Set GPIB Address
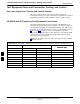
Refer to Figure F-5 and follow the procedure in Table F-4 to verify and,
if necessary, change the Agilent 8935 GPIB address.
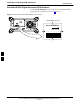
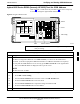
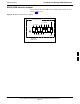
Figure F-5: Agilent 8935 Test Set
Preset
Cursor Control
Shift
Inst Config
Local
FW00885
NOTE
This procedure assumes that the test equipment is set up and
ready for testing.
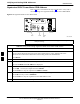
Table F-4: Verify and/or Change Agilent 8935 (formerly HP 8935) GPIB Address
Step Action
1
NOTE
The HP I/O configuration MUST be set to Talk & Listen, or no device on the GPIB will be
accessible. (Consult test equipment OEM documentation for additional information as required.)
To verify that the GPIB addresses are set correctly, press Shift and LOCAL on the Agilent 8935.
– The current HP–IB address is displayed at the top of the screen.
NOTE
HP–IB is the same as GPIB.
2 If the current GPIB address is not set to 18, perform the following to change it:
2a – Press Shift and Inst Config.
2b – Turn the Cursor Control knob to move the cursor to the HP–IB Adrs field.
2c – Press the Cursor Control knob to select the field.
2d – Turn the Cursor Control knob as required to change the address to 18.
2e – Press the Cursor Control knob to set the address.
3 Press Preset to return to normal operation.
F