
User's Manual

Preparing the LMF – continued
08/01/2001
3-7
1X SCt4812ET Lite BTS Optimization/ATP
PRELIMINARY
Creating a Named
HyperTerminal Connection for
MMI Communication
Confirming or changing the configuration data of certain BTS Field
Replaceable Units (FRU) requires establishing an MMI communication
session between the CDMA LMF computer and the FRU. Using features
of the Windows operating system, the connection properties for an MMI
session can be saved on the CDMA LMF computer as a named Windows
HyperTerminal connection. This eliminates the need for setting up
connection parameters each time an MMI session is required to support
optimization.
Once the named connection is saved, a shortcut for it can be created on
the Windows desktop. Double–clicking the shortcut icon will start the
connection without the need to negotiate multiple menu levels.
Follow the procedures in Table 3-3 to establish a named HyperTerminal
connection and create a Windows desktop shortcut for it.
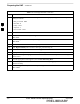
Table 3-3: Create HyperTerminal Connection
Step Action
1 From the Windows Start menu, select:
Programs > Accessories
2 Select Communications, double click the Hyperterminal folder, and then double click on the
Hypertrm.exe icon in the window which opens.
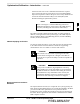
NOTE
S If a Location Information Window appears, enter the required information, then click on the
Close button. (This is required the first time, even if a modem is not to be used.)
S If a You need to install a modem..... message appears, click on NO.
3 When the Connection Description box opens:
– Type a name for the connection being defined (e.g., MMI Session) in the Name: window,
– Highlight any icon preferred for the named connection in the Icon: chooser window, and
– Click OK.
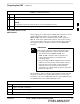
NOTE
For CDMA LMF computer configurations where COM1 is used by another interface such as test
equipment and a physical port is available for COM2, select COM2 in the following step to prevent
conflicts.
4 From the Connect using: pick list in the Connect To box displayed, select Direct to Com 1 or Direct
to Com 2 for the RS–232 connection port, and click OK.
. . . continued on next page
3