
User's Manual

Bay Level Offset Calibration68P09255A69-3
Aug 2002
1X SC4812ET Lite BTS Optimization/ATP Software Release 2.16.1.x
PRELIMINARY
3-89
Prerequisites
Before running this test, the following should be done:
The card in slot CSM 1, GLIs, BBXs have correct code load.
Primary CSM and MGLI are INS_ACT (bright green).
All BBXs are OOS_RAM (yellow).
Test equipment and test cables are calibrated and connected for TX
BLO calibration.
LMF is logged into the BTS.
After a TX calibration has been performed using the procedure in
Table 3-41, or if verification of BLO data in the CAL file is required,
follow the procedure in Table 3-43 to perform a BTS TX path audit.
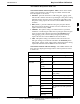
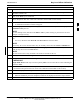
Table 3-43: TX Path Audit
Step Action
1 If it has not already been done, configure test equipment for TX path audit by following the procedure
in Table 3-38 (TX audit uses the same configuration as TX calibration).
2 Select the BBX(s) to be audited.
3 If the Test Pattern to be used is Standard, CDFPilot, or CDF, select at least one MCC (refer to “Test
Pattern Drop-down Pick List” under “TX Calibraton and the LMF” in this section).
4 Click Tests in the BTS menu bar, and select TX > TX Audit... from the pull-down menus.
- A CDMA Test Parameters window will appear.
5
Select the appropriate carrier(s) (carrier-bts#-sector#-carrier#) from those displayed in the
Channels/Carrier pick list (press and hold the <Shift> or <Ctrl> key to select multiple items).
NOTE
To select multiple items, hold down the Shift or Ctrl key while clicking on pick list items to select
multiple carrier(s)-sector(s).
6
Verify that the correct channel number for the selected carrier is shown in the Carrier # Channels
box.
- If it is not, obtain the latest bts-#.cdf and cbsc-#.cdf files from the CBSC.
NOTE
If necessary, the correct channel number may be manually entered into the Carrier # Channels box.
7 If at least one MCC was selected in Step 3, select the appropriate transfer rate (1 = 9600, 3 = 9600 1X)
from the drop-down list in the Rate Set box.
NOTE
The rate selection of 3 is only available if 1X cards are selected for the test.
8 In the Test Pattern box, select the test pattern to use for the calibration from the drop-down list (refer
to “Test Pattern Drop-down Pick List” under “TX Calibration and the LMF” in this section).
9 Click OK to display the status report window followed by a Directions pop-up window.
10 Follow the cable connection directions as they are displayed.
- When the calibration process is completed, results will be displayed in the status report window.
11 Click on the Save Results or Dismiss button, as desired, to close the status report window.
3