
User's Manual


GPIB Addresses
DRAFT
SC300 1X BTS Hardware Installation, ATP, and FRU Procedures
JAN 2002
7-40
Introduction
Use the following procedures to verify and/or change the GPIB
addresses of the applicable test equipment.
GPIB addresses can range from 1 through 30. The LMF will accept any
address in that range, but the numbers in the GPIB address boxes must
match the addresses of the test equipment. Motorola recommends that
you use 1 for a CDMA signal generator, 13 for a power meter, and 18 for
a CDMA analyzer.
The following procedures assume that the test equipment is
set up and ready for testing.
NOTE
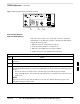
Verify the Gigatronics 8541C
Power Meter GPIB Address
Follow the steps in Table 7-21 to verify and, if necessary, change the
Gigatronics 8541C power meter GPIB address.
Table 7-21: Verify and/or Change Gigatronics 8541C Power Meter GPIB Address
Step Action
1
! CAUTION
Do not connect/disconnect the power meter sensor cable with AC power applied to the meter.
Disconnection could result in destruction of the sensing element or miscalibration.
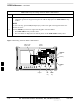
Press MENU (refer to Figure 7-18).
2 Use the arrow key to select CONFIG MENU and press ENTER.
3 Use the arrow key to select GPIB and press ENTER.
The system displays the current Mode and GPIB Address.
4 If the Mode is not set to 8541C, perform the following to change it:
– Use the arrow keys as required to select MODE.
– Use the arrow keys as required to set MODE to 8541C.
5 If the GPIB address is not set to 13, perform the following to change it:
– Use the arrow key to select ADDRESS.
– Use the arrow keys as required to set the GPIB address to 13.
6 Press ENTER to return to normal operation.
7